

Introduction
This article is the continuation of the three series article where we are trying to learn and get hands-on with Azure Kubernetes Services. In the last article, we created an ASP.NET Core application and containerized it with Docker. We created the local image of the application and tested it locally. In this article we’ll deploy that image to local Kubernetes cluster.
Thesis
In this article, we’ll demonstrate how to orchestrate the deployment and scaling of an entire ASP.NET Core application using Docker and Azure Kubernetes Services. The entire article will be divided into three parts as follows.
- Learning Azure Kubernetes Services – Day One: Containerize ASP.NET Core Applications with Docker.
- Learning Azure Kubernetes Services – Day Two: Deploy ASP.NET Core Applications on local Kubernetes Cluster.
Pre-requisites
Before we start there are some pre-requisites to be taken care of. Along with an Azure account and make sure the following stuff is installed on the development machine.
- Git for Windows.
- .Net Core 2.1 or above.
- Azure CLI
- Azure PowerShell
After Azure CLI installation, run the following command (az –version) to make sure the CLI is up and running.
The reader of this article is expected to have followed the last article as this is the continuation article.
Deploy on Local Kubernetes Cluster
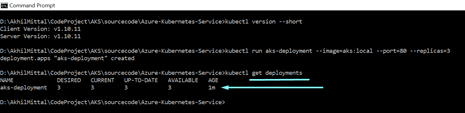
There are two approaches to deploy the image on local Kubernetes cluster i.e. running on developers’ machine. Make sure Kubernetes is installed and running. You can check the version by kubectl version –short command.

Interactive approach
Run the kubectl run command. Kubectl run followed by the name of a deployment<aks-deployment>, followed by the –image <ask:local>, then follow that with the –port switch and specify 80, which is the port our containers expose our application. The –replica switch to specify that 3 replicas are needed for the application.

When command executed, a deployment is created where the desired state is set to three replicas.
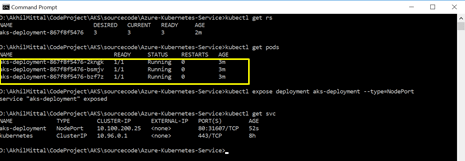
Next, a replica set is created that ensures that there are always three replicas of the application running.

The scheduler schedules the pod deployment on the worker node, which commands the Docker engine running on the worker node to pull the image and then run in pods.

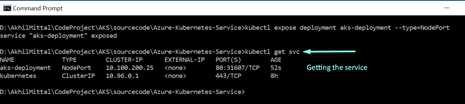
Once application deployed, create a service to expose this deployment. To create a service, run the kubectl expose command and use the type as NodePort. A service of the type NodePort exposes the service on each node’s IP at a static port. Run kubectl expose deployment aks-deployment –type=NodePort command.

This creates the service. Verify it by running kubectl get service or svc.
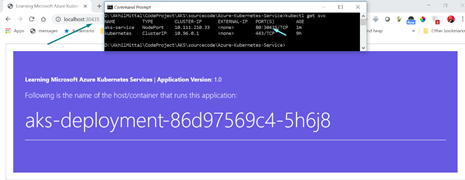
To connect to the service, launch the browser and connect to the localhost followed by the port number exposed on the node.

The application up and running. Now I have opened three browsers i.e. Chrome, IE, and Mozilla and hit the same URL. Let’s see what happens.

We see that the container hostname changes. That’s because behind the servers there are three pods, or containers, which the service is load balancing the request to.
Declarative Approach
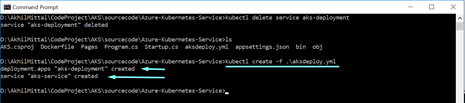
There is another approach called declarative approach to deploy the application. Clean up the deployment and service by deleting them with the use of kubectl delete command. Execute kubectl delete deployment aks-deployment and likewise delete the service as well.

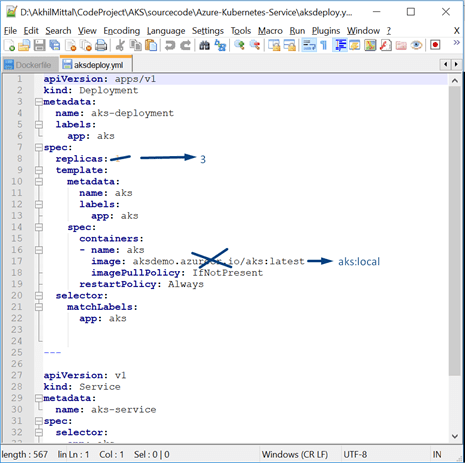
A deployment manifest file i.e. a YAML file is needed now. There is already a YAML file at the root of the application(aksdeploy.yml). Open it.

File has two divisions, the first creates the deployment and another exposes it as a service. Make the changes in the file as shown in the following image.

The command kubectl create -f .\aksdeploy.yml creates the deployment and service.
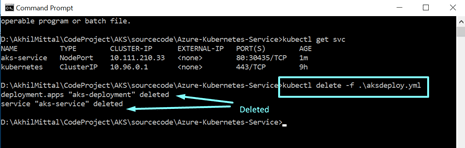
Check the status of the service using kubectl get svc and launch the browser to connect to the service.
So, the deployment is again successful with this approach as well.
Again, delete the deployment and the service, but this time by specifying the file name.
Conclusion
This article was an end to end article to understand how to containerize and deploy an ASP.NET application to local Kubernetes. In the next article we will explore Azure Container Registry (ACR) and how to deploy the image to Azure Kubernetes Services on Azure. Stay tuned!
Next >> Deploy the ASP.NET Core Application to Azure Kubernetes Services

2 comments