
Introduction:
In our article series of Learning MVC, we learnt a lot about MVC, about various techniques to communicate to database in MVC applications, and few internal concepts too.
When we indulge into realtime programming environment, we face not only one but many type of challenges in the code.My this article explains a new concept Auto Mapper in MVC application to overcome one of the major challenge we face while communicating with data entities and binding them to our model.
Challenge:
Sometimes while interacting with real time(database) entities and binding our model to them, we end up in a situation like,
var dbContext = new MyDBDataContext();
var userDetails = dbContext.Users.FirstOrDefault(userId => userId.UserId == id);
var user = newLearningMVC.Models.User();
if (userDetails != null)
{
user.UserId = userDetails.UserId;
user.FirstName = userDetails.FirstName;
user.LastName = userDetails.LastName;
user.Address = userDetails.Address;
user.PhoneNo = userDetails.PhoneNo;
user.EMail = userDetails.EMail;
user.Company = userDetails.Company;
user.Designation = userDetails.Designation;
}
return View(user);
The above mentioned code is not very hard to understand ,In the above code, an instance var dbContext = new MyDBDataContext(); is created from a LinqTOSql Context class, there after user details from a Users specific table have been fetched and stored in var userDetails variable.We had an existing model named User(LearningMVC.Models.User()), that has similar properties as that of Users class generated from database, now we initialize properties of instance of our model from properties of instance of User class from database, so that we can populate our View in a MVC application.
We see here there are 8 properties that are similar to each other but each set lies in separate class, one in Model, and one in Users class.And what we do is one by one we bind these properties to our model and pass it to View.Now problem is what if we have 100 column records coming from database, and also our model have same no. of properties, and the code has to be repeated 6-7 times at different scenarios, now do we still follow such strategy of binding each property from db to model, trust me the code will be 100 pages large, and will be charging 5 times the effort just to bind the model from domain entities.
To overcome this tedious situation AutoMapper is introduced.It not only reduces the effort, but also limits the execution time that has been taken by such a large no. of lines to execute.
Auto Mapper:
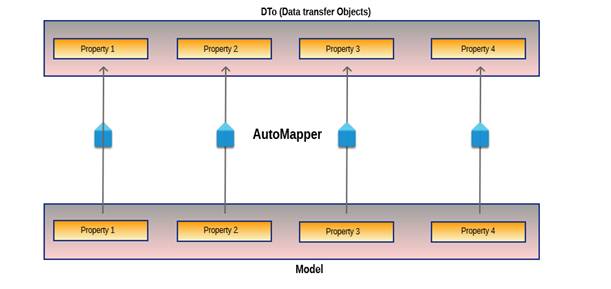
As per the AutoMapper CodePlex web page “AutoMapper is an object-object mapper. Object-object mapping works by transforming an input object of one type into an output object of a different type. What makes AutoMapper interesting is that it provides some interesting conventions to take the dirty work out of figuring out how to map type A to type B. As long as type B follows AutoMapper’s established conventions, almost zero configuration is needed to map two types.” therefore, it provides the solution for our mapping issue.
Install AutoMapper:
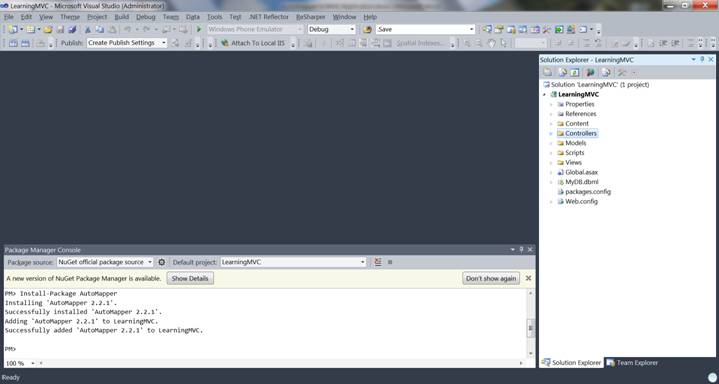
Tools -> Library Packet Manager -> Packet manager Console
Then in the console window opened at bottom of Visual Studio, type:
PM> Install-Package AutoMapper
Press Enter, this will install AutoMapper and when next time you open MVC application in Visual Studio , it will automatically add dll reference to project.
AutoMapper in Action:
Lets Create an MVC application first, you can create an MVC application, and connect it with database using LINQ to SQl following my article http://www.codeproject.com/Articles/620197/Learning-MVC-Part-2-Creating-MVC-Application-and-P
I have also attached the code of Existing MVC application used without AutoMapper.
Now let’s evaluate all the Controller Actions one by one and convert the code using AutoMapper.
Step1: Create database for existing application, the databse script is attached with the source code,

Open Existing MVC Application in Visual Studio,

See that AutoMapper is referenced in project, now use that namespace in MyController,as,

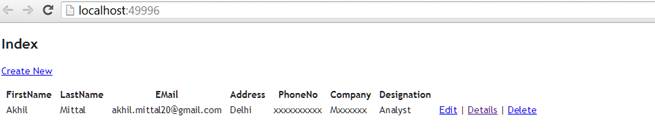
Step2: Index Action:
In the very first Action of our controller MyController(Can be found under Controllers folder), Index Action, we see the code,
public ActionResultIndex()
{
var dbContext = new MyDBDataContext();
var userList = fromuser in dbContext.Users select user;
var users = new List<LearningMVC.Models.User>();
if (userList.Any())
{
foreach (varuser in userList)
{
users.Add(new LearningMVC.Models.User()
{
UserId = user.UserId,
Address = user.Address,
Company = user.Company,
FirstName = user.FirstName,
LastName = user.LastName,
Designation = user.Designation,
EMail = user.EMail,
PhoneNo = user.PhoneNo
});
}
}
return View(users);
}
Now where will AutoMapper fit in here, you know that, it will be used to replace the property mapping done one by one in the code, therefore,
Just at the first line of code, define a AutoMap,
To create the default mapping, call the Mapper.CreateMap() with proper types. In this case, T1 will be LearningMVC.Userand T2 will be LearningMVC.Models.User
Mapper.CreateMap<LearningMVC.User, LearningMVC.Models.User>();
LearningMVC.User -> DTO Object Class
LearningMVC.Models.User -> Model Class to bind the View
So, here we define a mapping between, DTO and Model class with the help of AutoMapper class.
Now inside foreach loop, replace the whole code by,
LearningMVC.Models.UseruserModel = Mapper.Map<LearningMVC.User, LearningMVC.Models.User>(user);
users.Add(userModel);
Finally call the Mapper.Map(obj1) to get the mapped object of T2.
So, our final Action code,
public ActionResultIndex()
{
Mapper.CreateMap<LearningMVC.User, LearningMVC.Models.User>();
var dbContext = new MyDBDataContext();
var userList = fromuser in dbContext.Users select user;
var users = new List<LearningMVC.Models.User>();
if (userList.Any())
{
foreach (varuser in userList)
{
LearningMVC.Models.User userModel = Mapper.Map<LearningMVC.User, LearningMVC.Models.User>(user);
users.Add(userModel);
}
}
return View(users);
}
We see now, we escaped that boring work of matching properties one by one.Now run the application, and you’ll see the application running as before.
Step 3: Details Action:
Existing Code
public ActionResultDetails(int? id)
{
var dbContext = new MyDBDataContext();
var userDetails = dbContext.Users.FirstOrDefault(userId => userId.UserId == id);
var user = newLearningMVC.Models.User();
if (userDetails != null)
{
user.UserId = userDetails.UserId;
user.FirstName = userDetails.FirstName;
user.LastName = userDetails.LastName;
user.Address = userDetails.Address;
user.PhoneNo = userDetails.PhoneNo;
user.EMail = userDetails.EMail;
user.Company = userDetails.Company;
user.Designation = userDetails.Designation;
}
return View(user);
}
New Code with AutoMapper
public ActionResultDetails(int? id)
{
var dbContext = new MyDBDataContext();
Mapper.CreateMap<LearningMVC.User, LearningMVC.Models.User>();
var userDetails = dbContext.Users.FirstOrDefault(userId => userId.UserId == id);
LearningMVC.Models.User user = Mapper.Map<LearningMVC.User, LearningMVC.Models.User>(userDetails);
return View(user);
}
Step4: Create Action (POST)
Existing Code
[HttpPost]
public ActionResultCreate(LearningMVC.Models.User userDetails)
{
try
{
var dbContext = newMyDBDataContext();
var user = newUser();
if (userDetails != null)
{
user.UserId = userDetails.UserId;
user.FirstName = userDetails.FirstName;
user.LastName = userDetails.LastName;
user.Address = userDetails.Address;
user.PhoneNo = userDetails.PhoneNo;
user.EMail = userDetails.EMail;
user.Company = userDetails.Company;
user.Designation = userDetails.Designation;
}
dbContext.Users.InsertOnSubmit(user);
dbContext.SubmitChanges();
return RedirectToAction(“Index”);
}
catch
{
return View();
}
}
New Code with AutoMapper
[HttpPost]
public ActionResultCreate(LearningMVC.Models.User userDetails)
{
try
{
Mapper.CreateMap<LearningMVC.Models.User, LearningMVC.User>();
var dbContext = newMyDBDataContext();
varuser = Mapper.Map<LearningMVC.Models.User, LearningMVC.User>(userDetails);
dbContext.Users.InsertOnSubmit(user);
dbContext.SubmitChanges();
return RedirectToAction(“Index”);
}
catch
{
return View();
}
}
Note that, in here we interchanged the mapping, because now we had to read from Model and bind to our DTO fror Create Action, so just interchange the mapping, and run the application,Now our T1 is Model and T2 is DTO.
Step5: Edit Action:
Existing Code
public ActionResultEdit(int? id)
{
var dbContext = new MyDBDataContext();
var userDetails = dbContext.Users.FirstOrDefault(userId => userId.UserId == id);
var user = newLearningMVC.Models.User();
if (userDetails != null)
{
user.UserId = userDetails.UserId;
user.FirstName = userDetails.FirstName;
user.LastName = userDetails.LastName;
user.Address = userDetails.Address;
user.PhoneNo = userDetails.PhoneNo;
user.EMail = userDetails.EMail;
user.Company = userDetails.Company;
user.Designation = userDetails.Designation;
}
return View(user);
}
New Code with AutoMapper
public ActionResultEdit(int? id)
{
Mapper.CreateMap<LearningMVC.User, LearningMVC.Models.User>();
var dbContext = new MyDBDataContext();
var userDetails = dbContext.Users.FirstOrDefault(userId => userId.UserId == id);
var user = Mapper.Map<LearningMVC.User, LearningMVC.Models.User>(userDetails)
return View(user);
}
Step6: Delete Action:
Existing Code
public ActionResultDelete(int? id)
{
var dbContext = new MyDBDataContext();
var user = newLearningMVC.Models.User();
var userDetails = dbContext.Users.FirstOrDefault(userId => userId.UserId == id);
if (userDetails != null)
{
user.FirstName = userDetails.FirstName;
user.LastName = userDetails.LastName;
user.Address = userDetails.Address;
user.PhoneNo = userDetails.PhoneNo;
user.EMail = userDetails.EMail;
user.Company = userDetails.Company;
user.Designation = userDetails.Designation;
}
returnView(user);
}
New Code using AutoMapper
public ActionResultDelete(int? id)
{
var dbContext = new MyDBDataContext();
Mapper.CreateMap<LearningMVC.User, LearningMVC.Models.User>();
var userDetails = dbContext.Users.FirstOrDefault(userId => userId.UserId == id);
var user = Mapper.Map<LearningMVC.User, LearningMVC.Models.User>(userDetails);
return View(user);
}
ForMember() and MapFrom() in AutoMapper:
The two important functions in AutoMapper play an important role in object mapping, Suppose our model/viewmodel class have a property as FullName, and from the DTO we want to add the FirstName and Last Name of the user to make it a full name nad bind it to model,to overcome these kind of scenarios ForMember() and MapFrom() come in action,See below code,
Mapper.CreateMap<LearningMVC.User, LearningMVC.Models.User>().ForMember(emp => emp.Fullname,
map => map.MapFrom(p => p.FirstName + ” “+ p.LastName));
Here we are saying that ForMember FullName in our model class, map properties from FirstName and LastName of User DTO.
The code is itself self explanatory.
This kind of mapping is also called Custom Mapping.
Conclusion:
In this article we learnt how to do custom mapping and entity to entity mapping with the help of AutoMapper. Since this was just a glimpse of the concept there is lot more to explore in this topic in detail.
I have skipped the POST methods for Edit and Delete, this will be a kind of homework for you. Once you completely follow and understand, you can easily complete those two pending Actions as well.Let me see the source code J as well.
Read more:
- C# and ASP.NET Questions (All in one)
- MVC Interview Questions
- C# and ASP.NET Interview Questions and Answers
- Web Services and Windows Services Interview Questions
Other Series
My other series of articles:
For more technical articles you can reach out to my personal blog CodeTeddy.
