
Introduction
There are number of ways provided by Microsoft to create a setup project for windows application.
But when I started to create one, I got nothing but queries and confusions of how to start and where to start. There are numerous articles I found over network, explaining to create a setup project, but some does not work as they say, and some do not have a live example to follow.
The driving force for me to write this article is my QC team, who except the main application to test also verified my setup installer with their 100% effort L. And guess what, they were successful to find bugs in that too.
In this article I would like to explain a step by step process to create a windows application and a setup installer for the same in a very simple manner, that is easy to understand and follow, alternatively there are n no. of ways to do so.
Start the Show
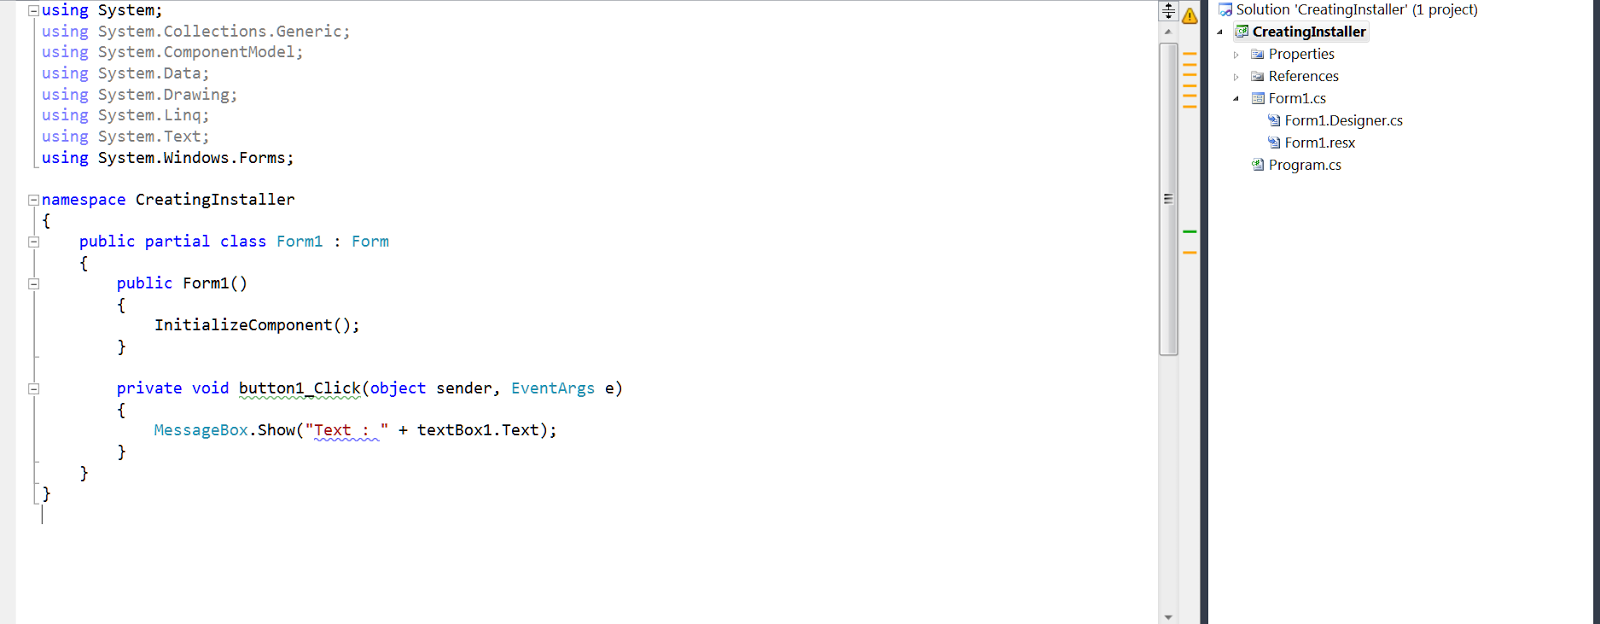
Firstly let’s create a simple one form windows application, having a text box and a button only.
Creating windows application is just for the sake of having one to install.

I gave the name CreatingInstaller to my windows application, obviously you can have your own.
Thus adding a new Windows Form Application in my solution and adding a text box and button to the default form resulted in the figure as shown below. Decorate the control properties as per your will.

Just wanted to write few lines of code, so I binded button’s click event to show text box’s text,
Primary Objective
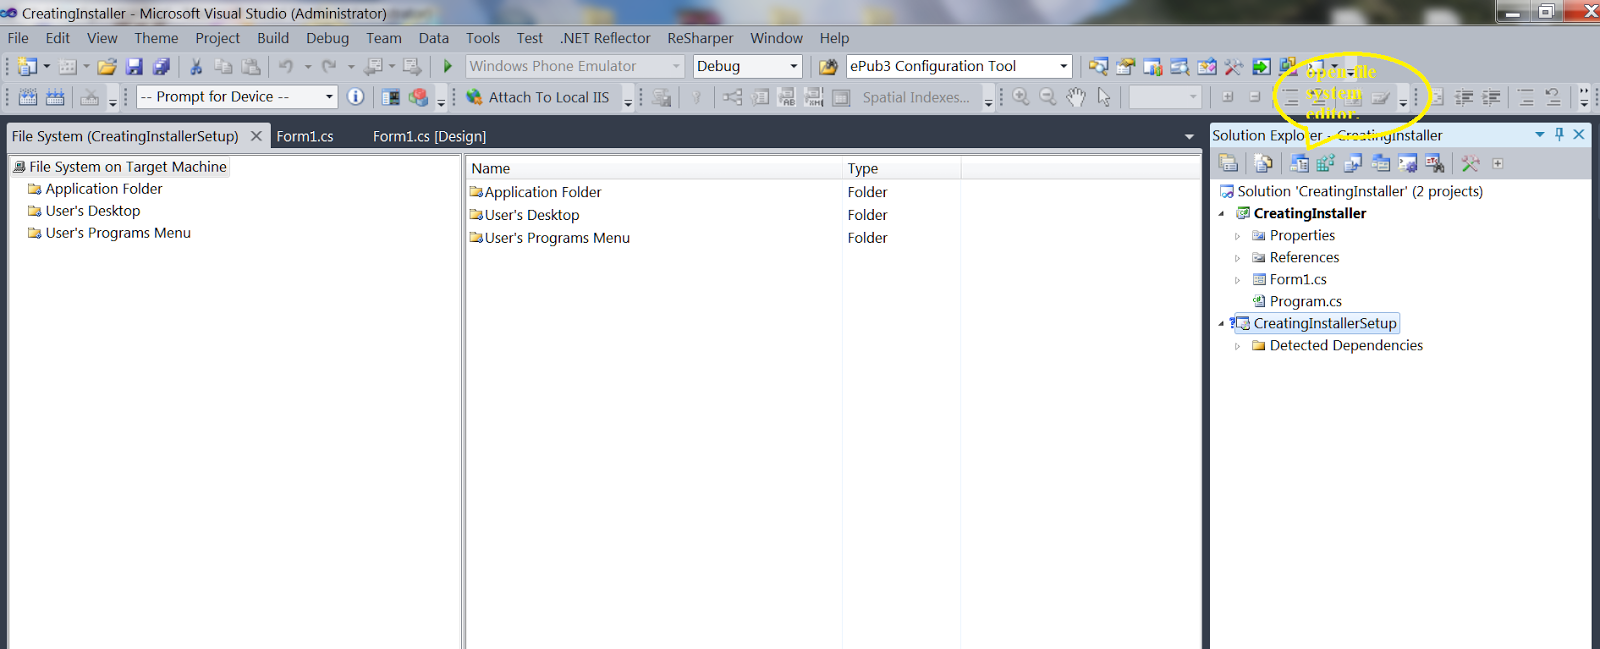
So far so good. Now let’s create a installer for the same windows application. Right click on solution and add a new project to your solution like in following figure,

And add a setup project by Other project Types->Setup and Deployment->Visual Studio Installer

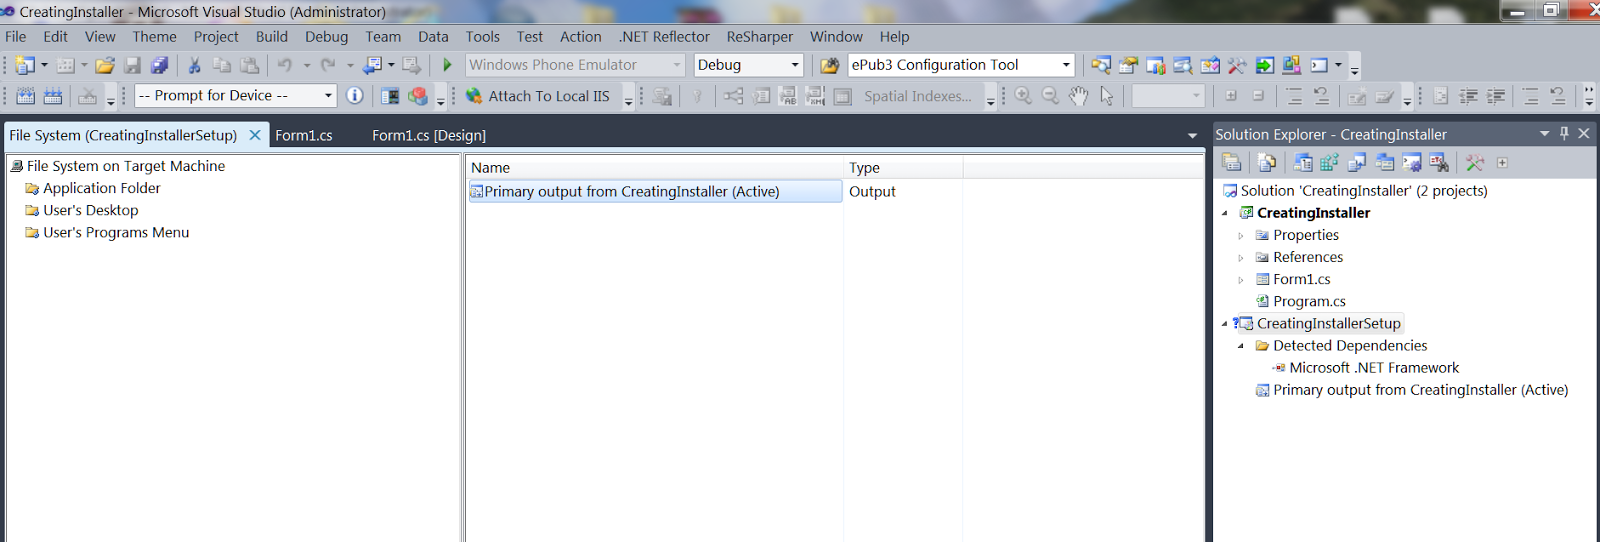
The project will be added to the solution , now open file system editor by clicking on the project and selection the option to open file system editor, like shown in below figure,
You’ll get to see Application Folder, User’s Desktop and User’s Program Menu.
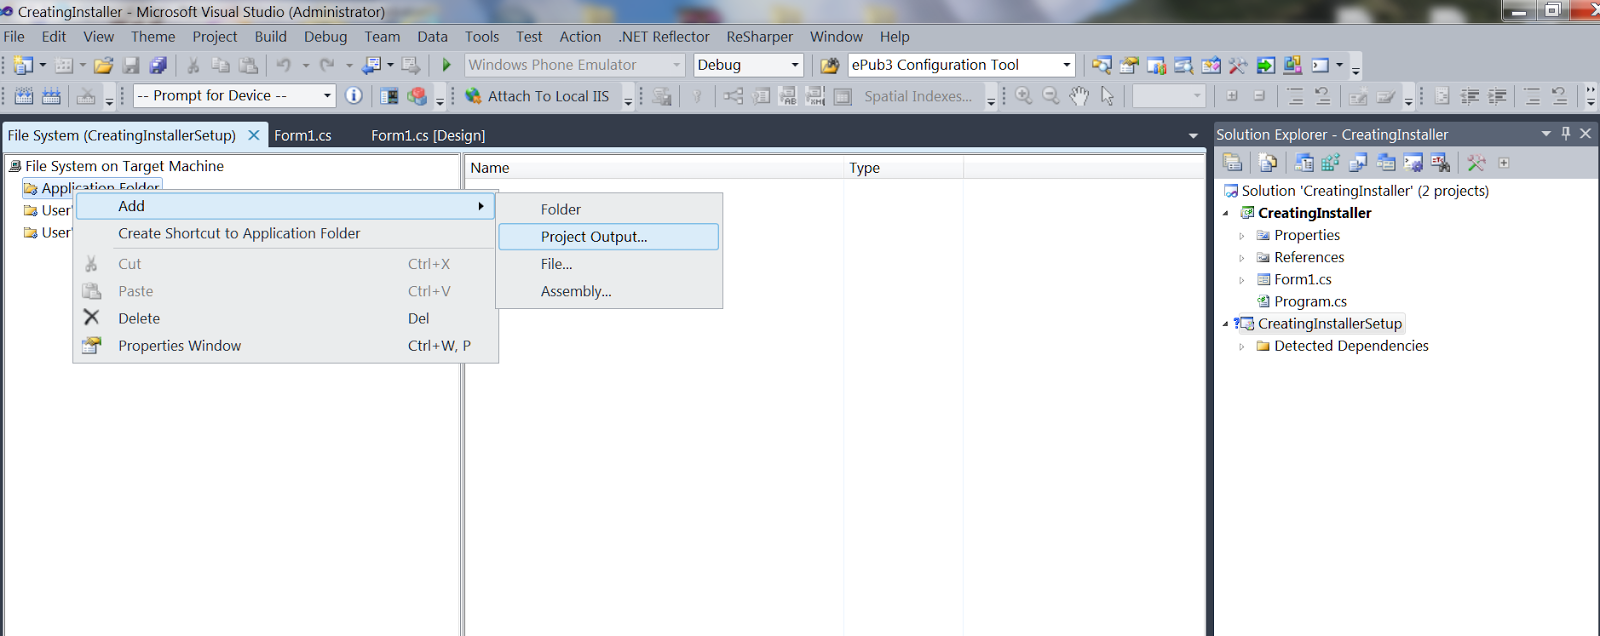
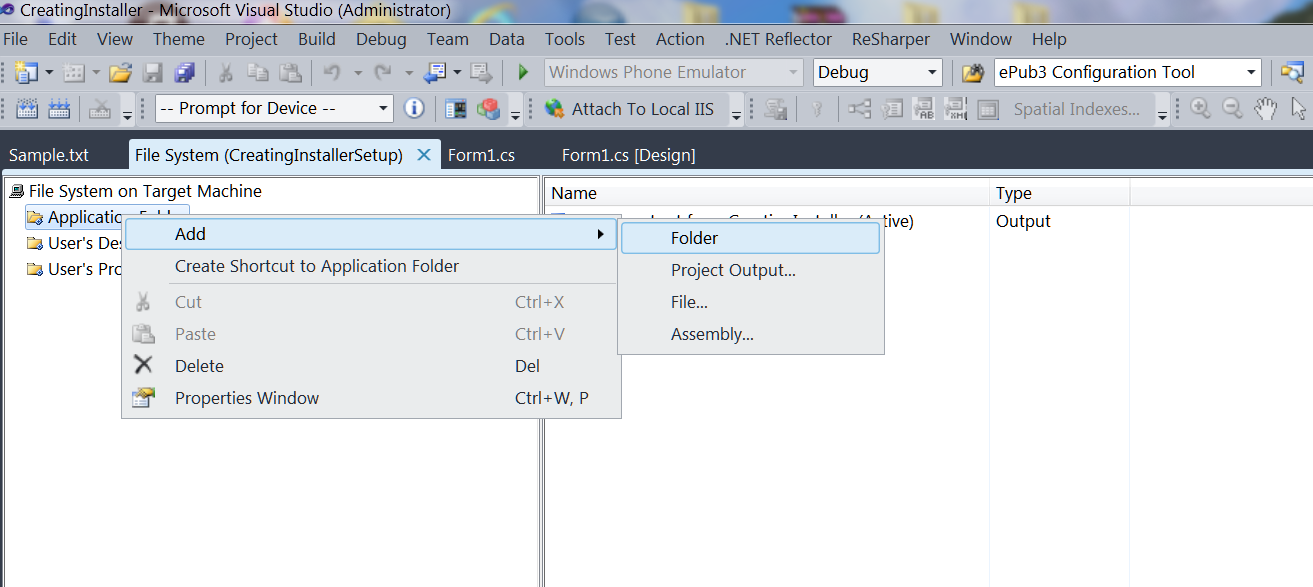
Right click on Application Folder and add an output project. Out project specifies the project we are creating an installer to, like in the following figure:
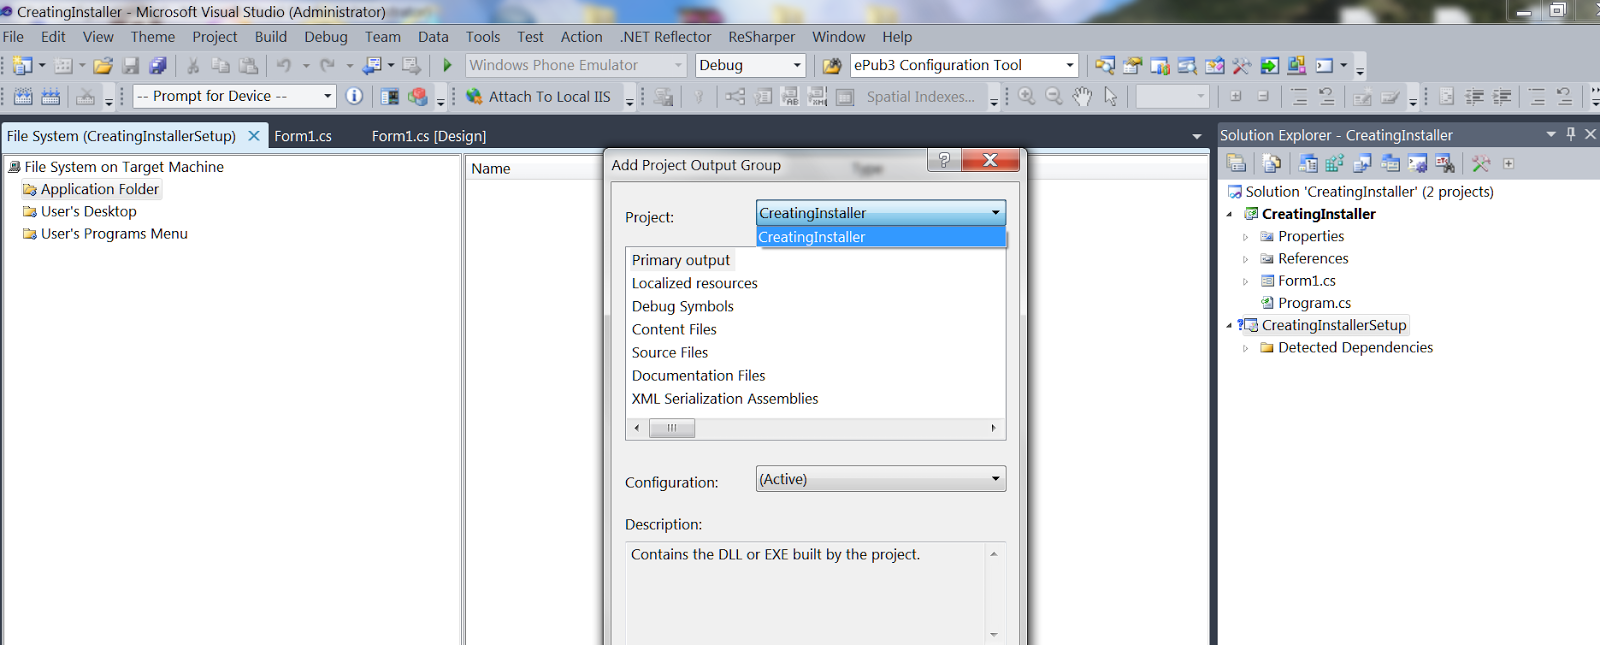
Select CreatingInstaller i.e. the windows application project name in Add output project window, select it as a primary output as shown below and click ok.
The Primary output will be added as shown below, having type defined as Output.
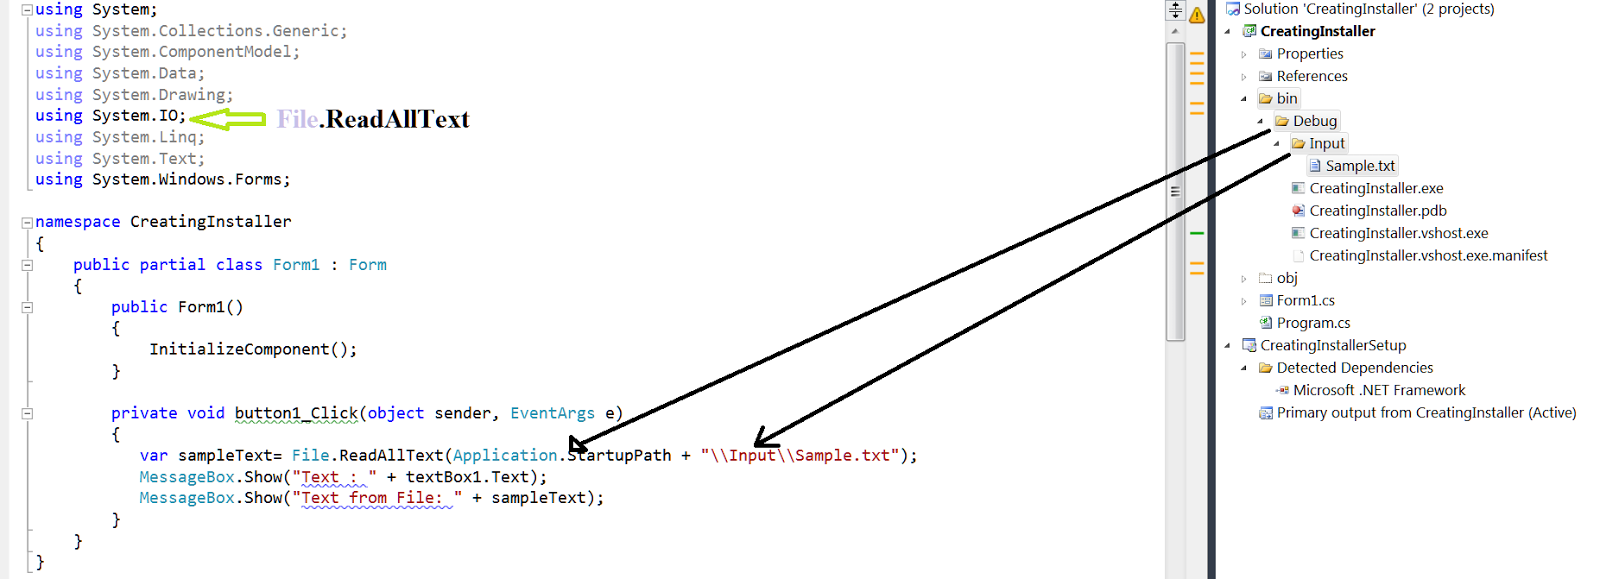
In the meanwhile lets add some more functionality to our windows application, lets read a file and show its output in a message box on button click. Therefore just add a text file, I called it Sample.txt to the bin\debug\Input folder, Input is the custom folder I created to place my txt file.
Write few lines of code just to read the txt file from Startup path, in my case bin\debug, it could also be bin\release as per project build, and specify the file folder name and file name to tead the content.I chose to keep my txt file at startup path so that I could explain how we can create files and folders at the time of installation. Now we also need this Input folder and a Sample.txt file at the time of installation to be located at the location of installed application.
For file operations I added the namespace System.IO, needless to specify this though.
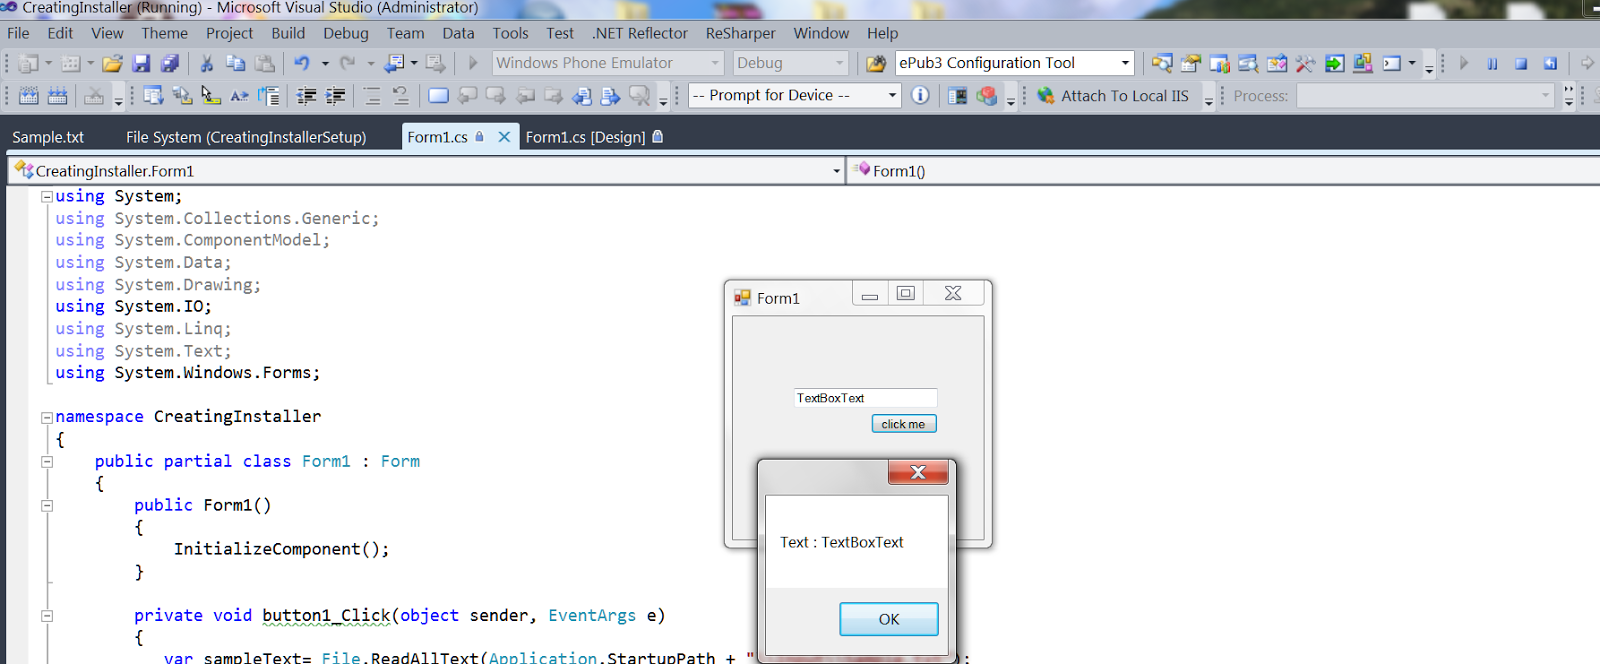
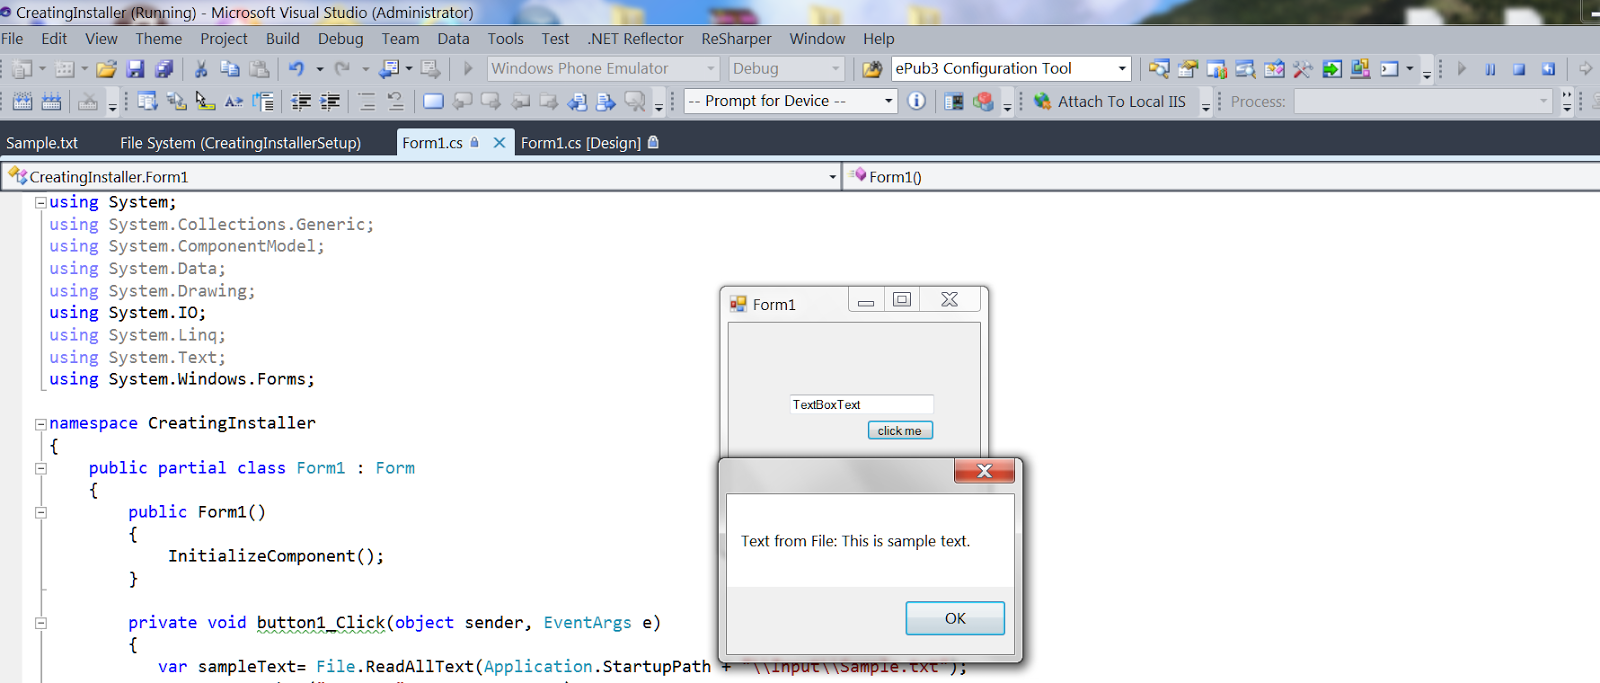
Therefor running the application will show two message boxes one after another showing text box text and text from Sample.txt file.
Now this folder creation logic has to be implemented in out setup project, so that when the application installs, it has all the pre-requisites required to run the application, like the Input folder and the Sample.txt file.
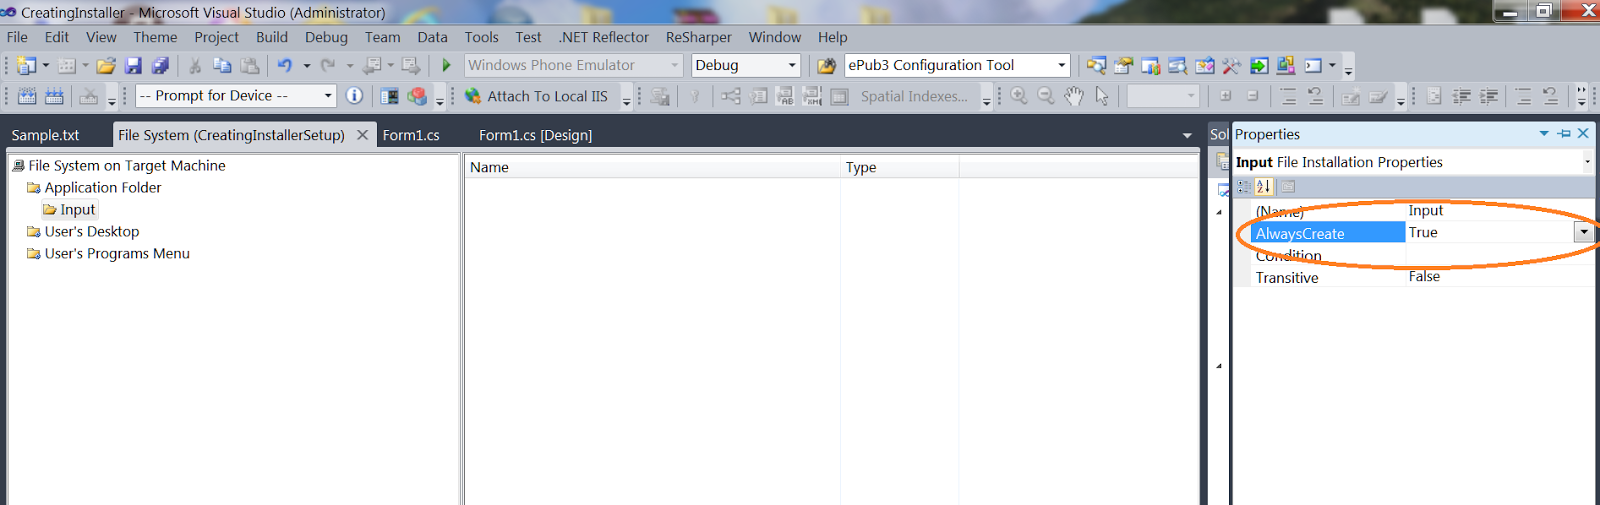
So, right click on Application Folder in File system editor and add a folder. The folder will be created just below the Application Folder, name that folder Input.
Right click on folder, select properties and mark Always Create property to True.That means folder will always be created whenever we run the installer, after a fresh build release.
Create Shortcuts
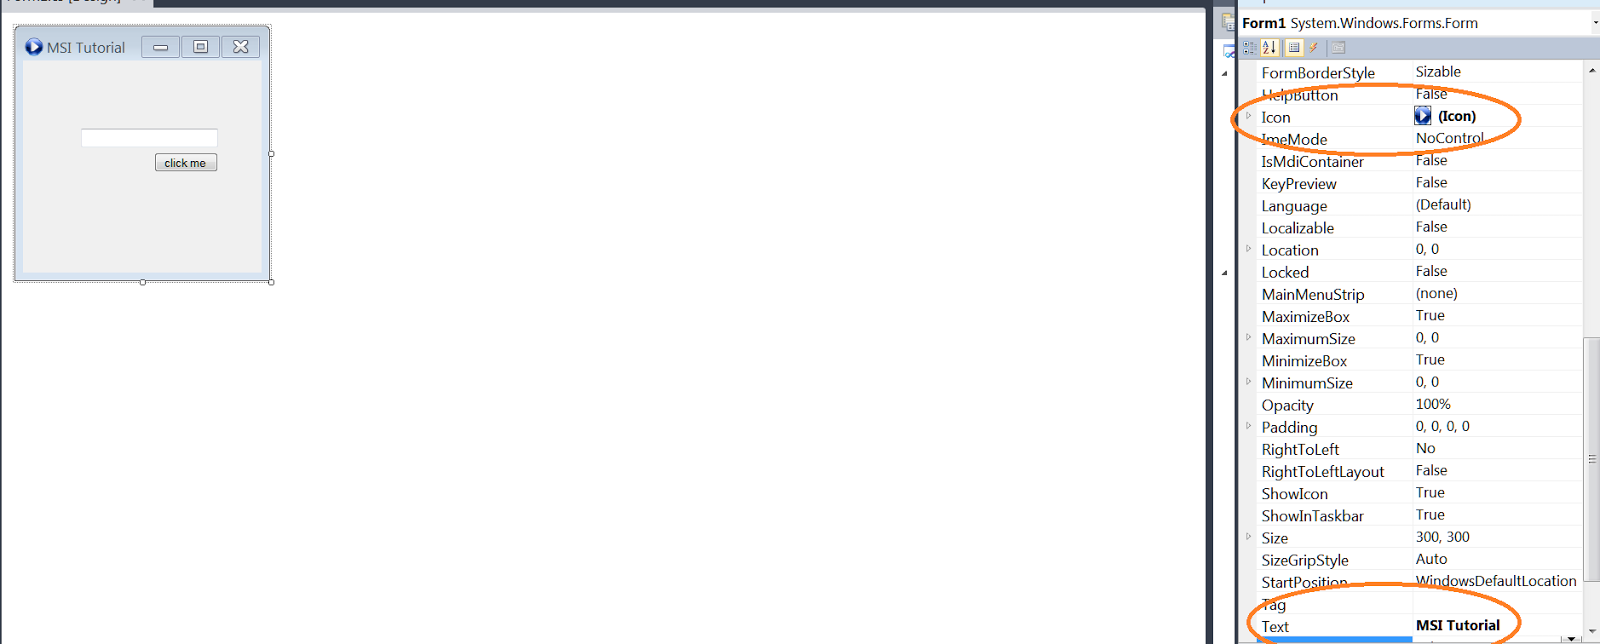
You can decorate your form to add an icon to it, that icon will also be required at the time of installation to create a shortcut icon to our application. Add an icon to the form like in below mentioned figure,
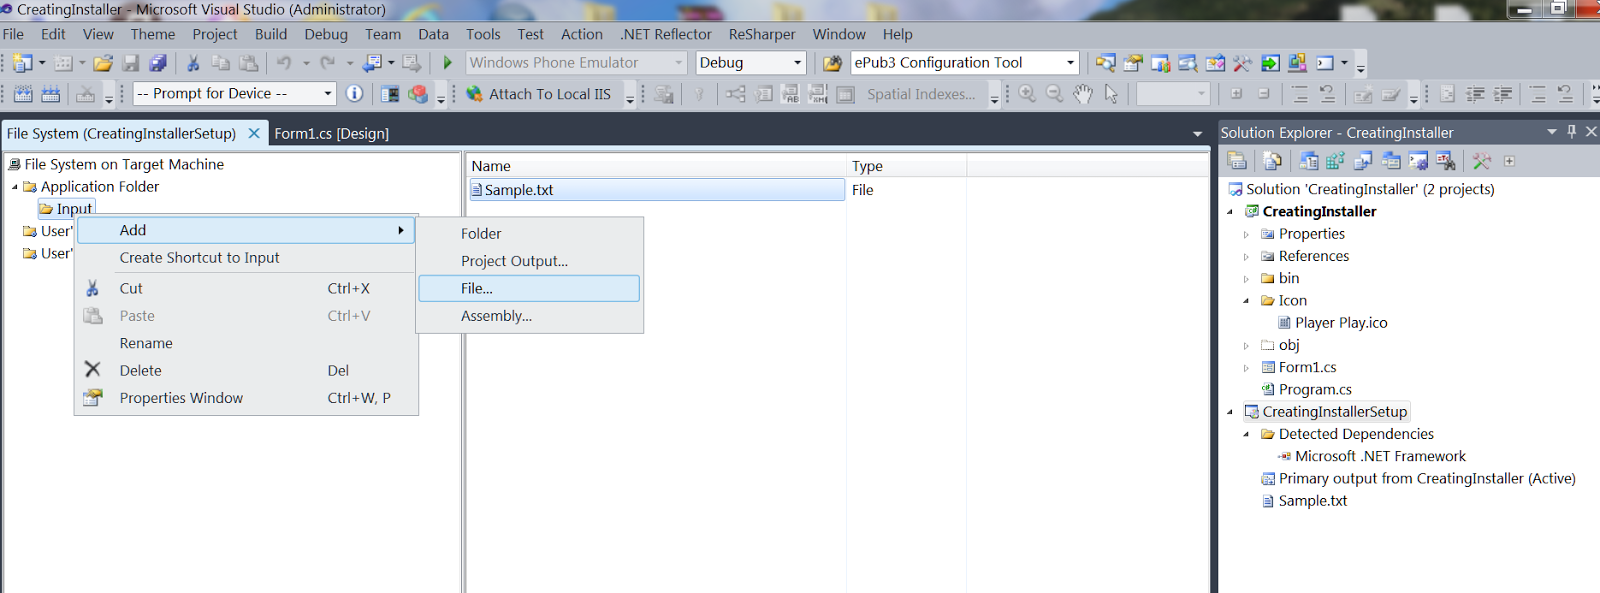
Time to add Sample.txt file. Right click the Input folder created and Add file to it, browse for the Sample.txt file in the Windows Application project we created earlier.
To create a shortcut to the application, right click on Primary output in middle window pane and select Create shortcut to Primary output, name that shortcut as CreatingInstaller.
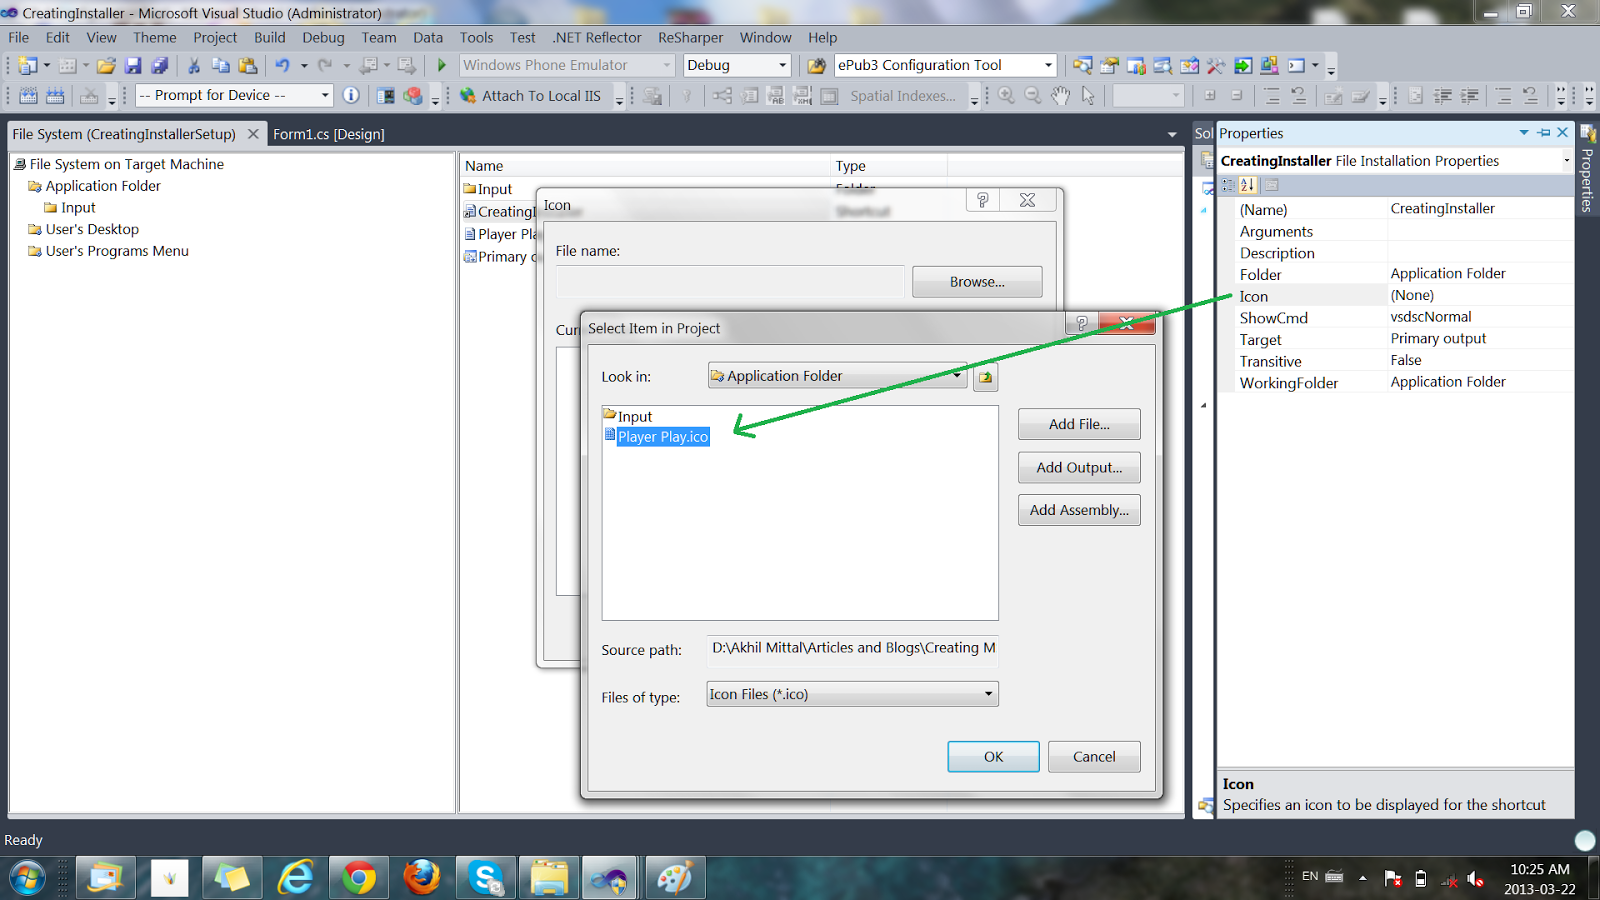
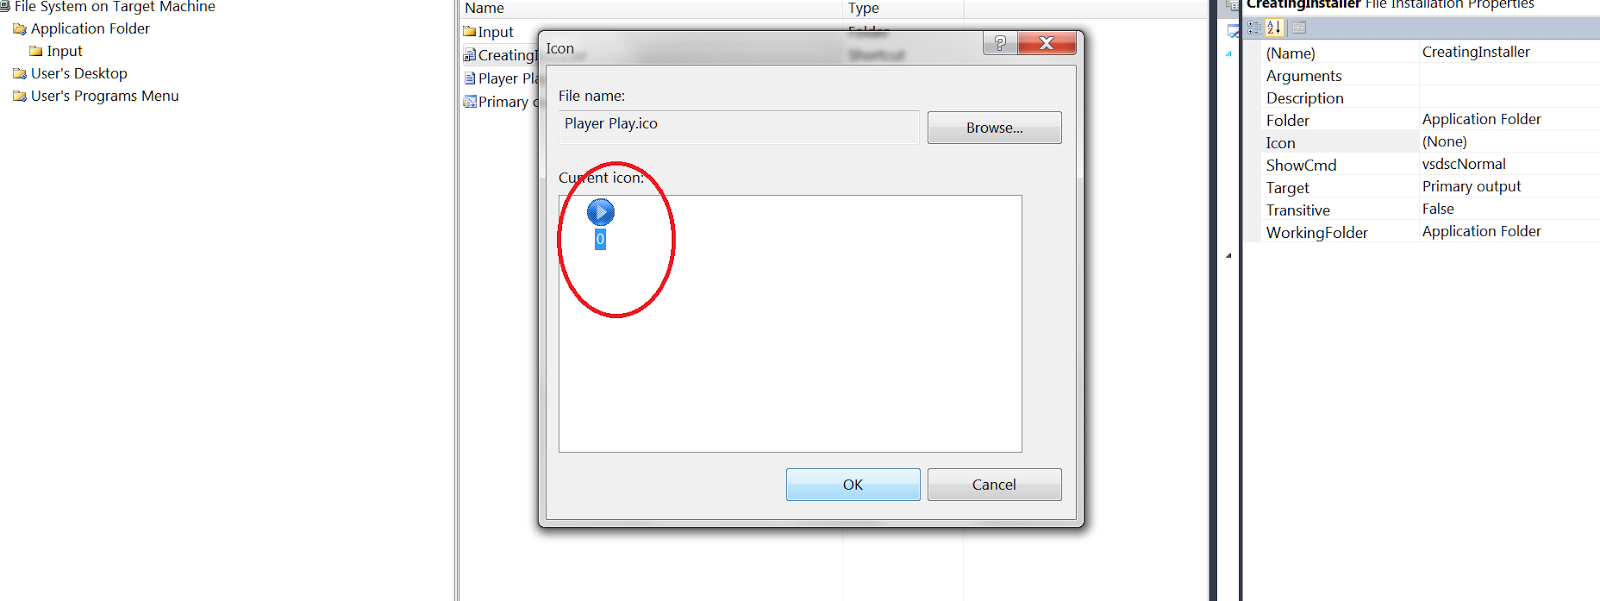
Select the properties of the shortcut, by right clicking it and add an icon to it. This icon will be created at desktop when the application will launch. Below figures explain how to add an icon.
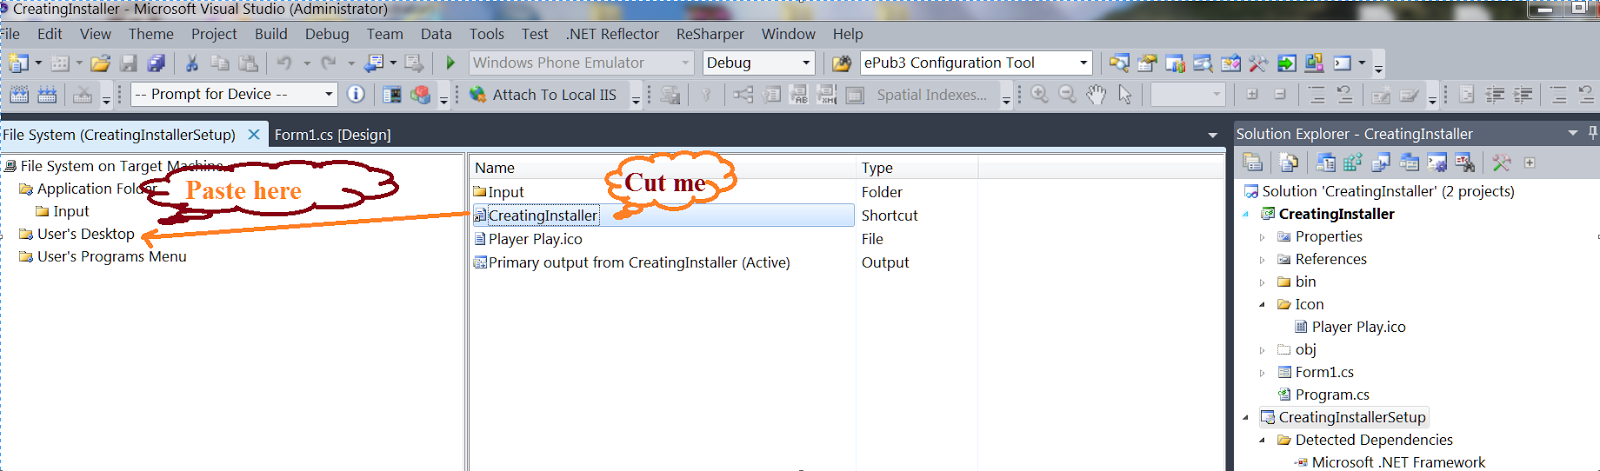
Cut the shortcut created at Application Folder and Paste it under User’s Desktop Folder.Job done to create a shortcut to user’s desktop.
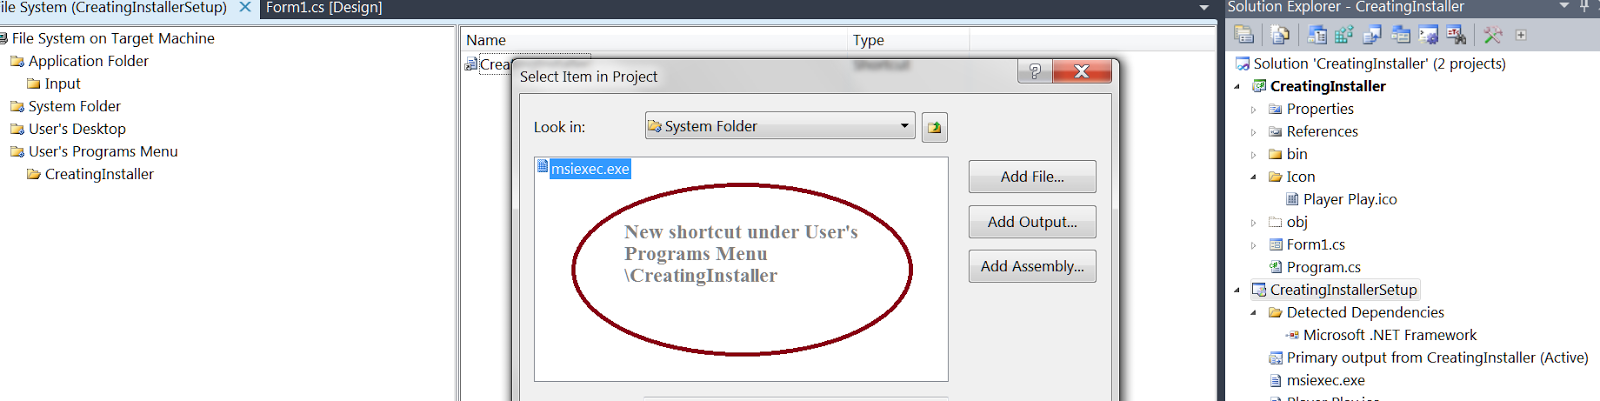
For shortcuts to be created at User’s Program Menu, add a new folder to User’s Program Menu, that will be created at program’s menu location, in that folder create a new shortcut pointing the primary output as done for creating desktop shortcut. The three images as following describes the process,
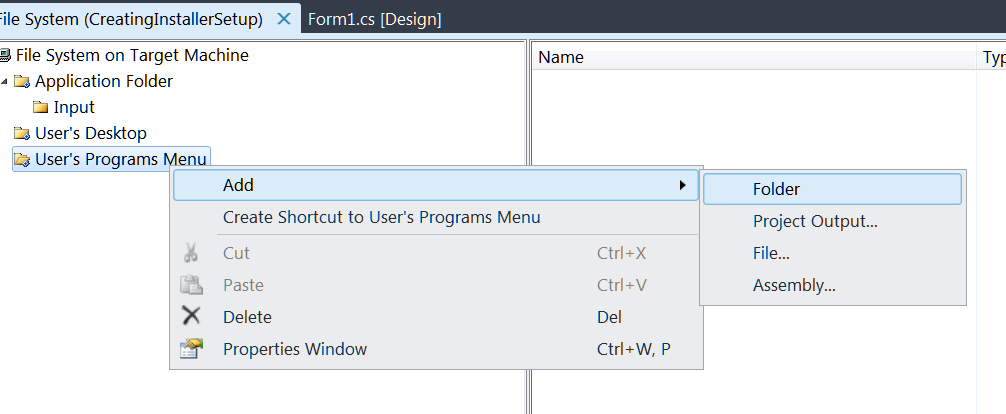
Name the folder CreatingInstaller.
Right click on middle window pane to create a new shortcut.

Select shortcut source to primary output selected.
Also add icon to shortcut, as done for Desktop shortcut.

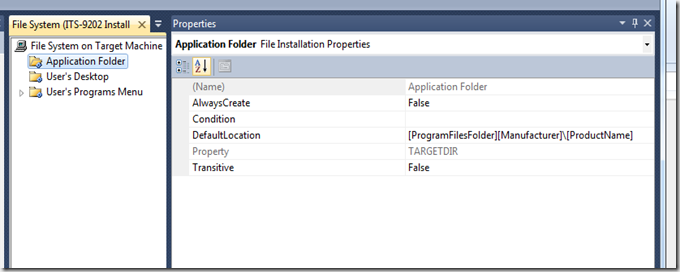
Right click Application folder to set the properties of where to install the application,
Uninstall
We always have an option to uninstall the application from control panel’s Programs and Features list as simple as that but how about creating our own uninstaller, that too under programs menu so that we do not have to disturb control panel.
Step1:
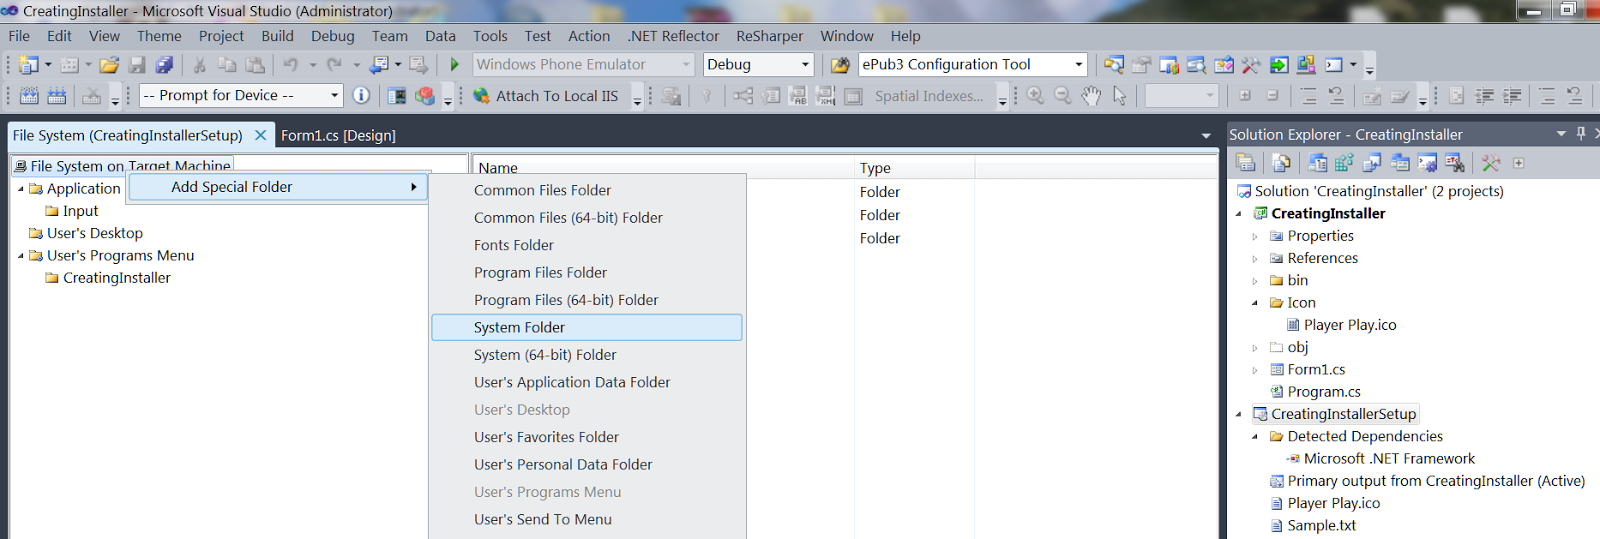
Right click on File System on target Machine and Add Special Folder->System Folder as shown in below figure.
Step2:
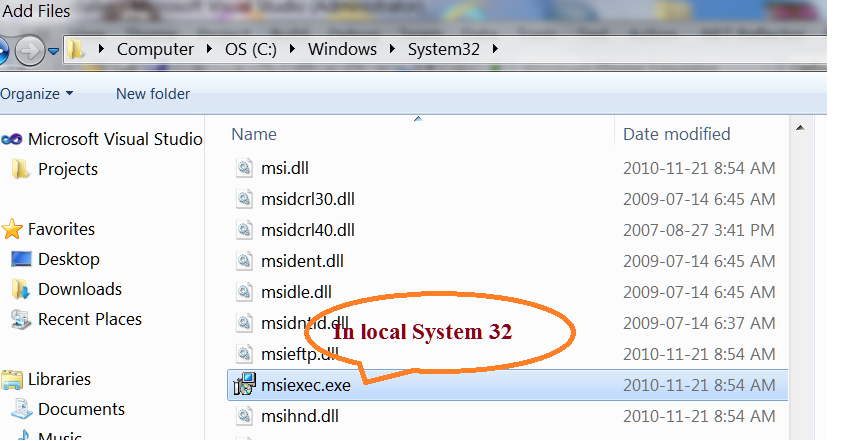
Right click on newly created system folder and browse for msiexec.exe file in local System.Windows32 folder. This file takes responsibility to install and uninstall the application based on certain parameters specified.
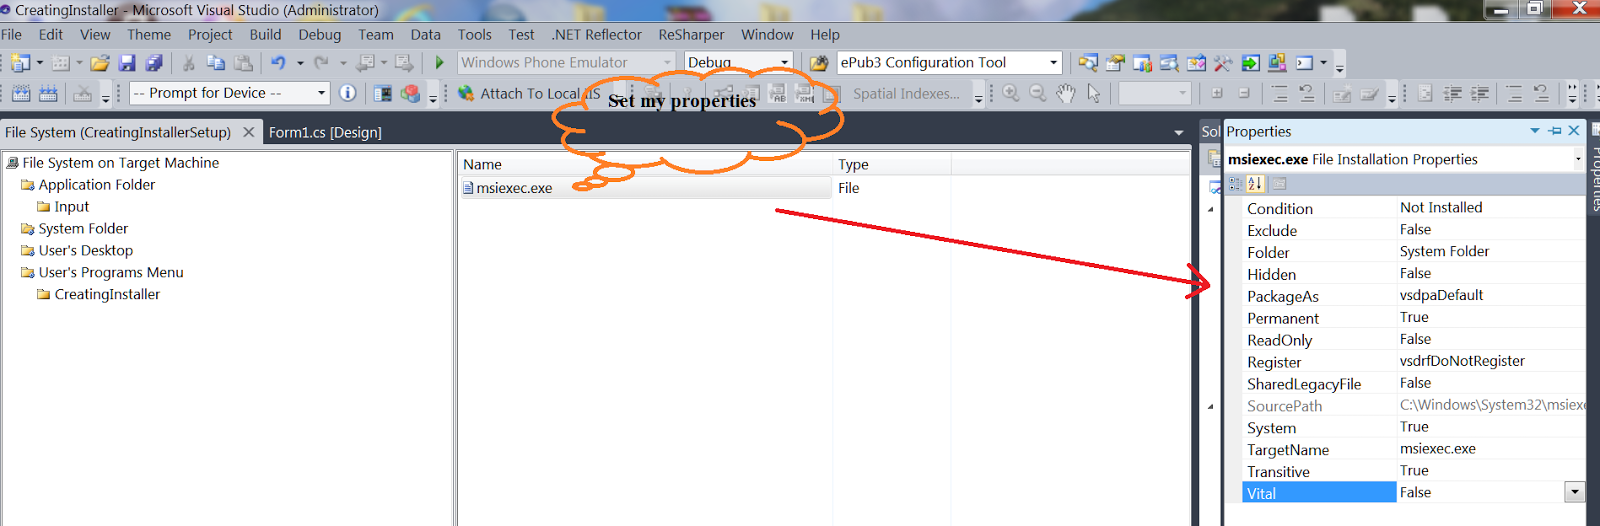
Set the properties of the file exactly as shown in the figure,
Step4:
Now create a new shortcut under User’s program Menu and point its source to msiexec as shown below. You can add icons and name to your shortcut. I have given it the name “Uninstall”.
Step5:
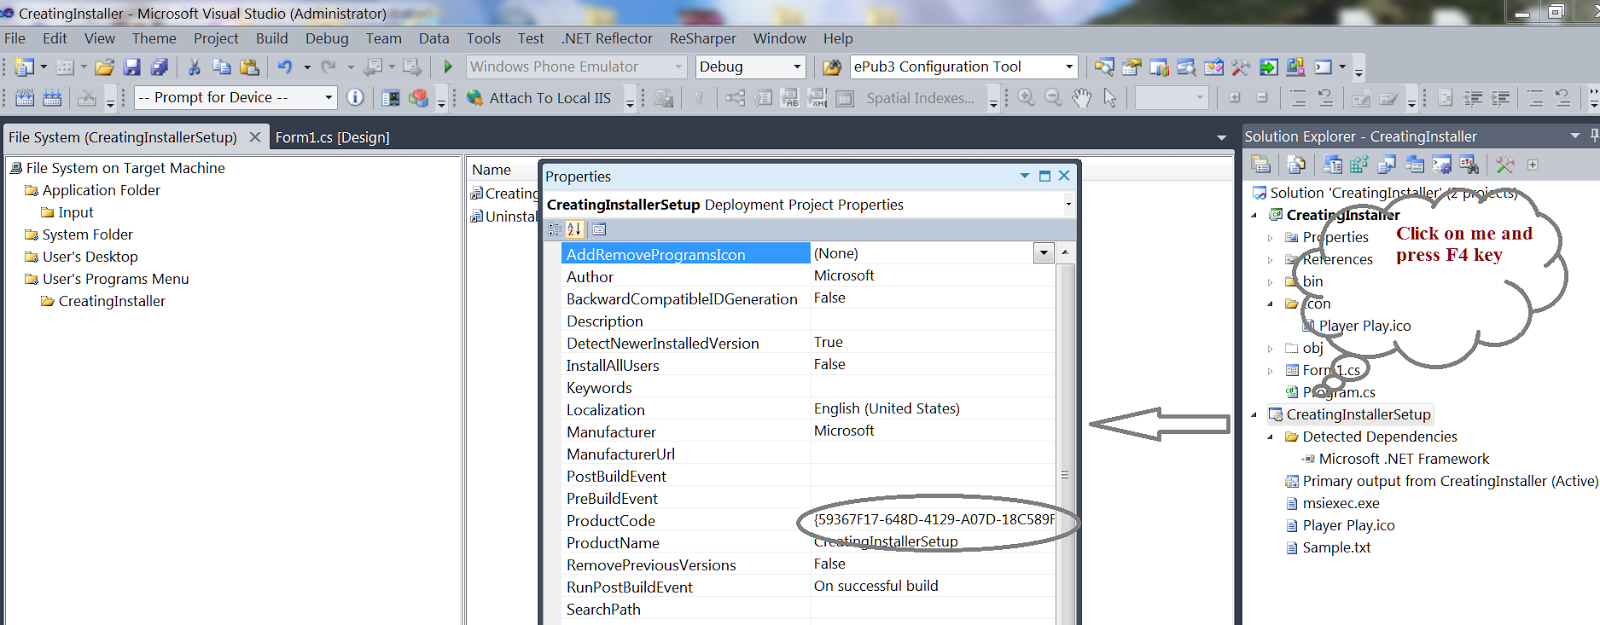
Press F4 key by selecting the setup project, we see a list of properties, we can customize these properties as per out installation needs, like set Product name, Author, Installation location, I’ll not go into a deep discussion about all this, as they are quite easy to understand and set.
Just take a note of product code shown below in the list of properties. We would need product code as a parameter to msiexec for uninstallation.
Step6:
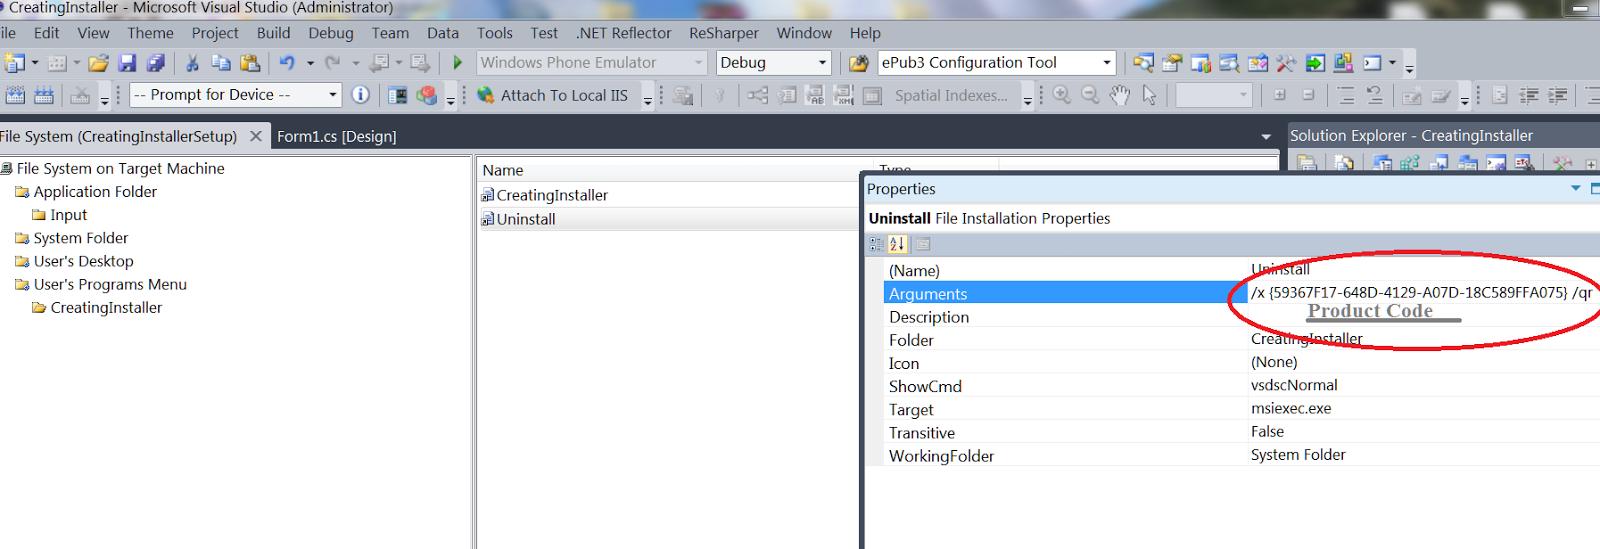
Right click the Uninstall shortcut and set the arguments property as shown in below figure,
/x {product code} /qr
/x is for uninstalltion.
You can get the whole detaild list of parameters and their use at http://technet.microsoft.com/en-us/library/cc759262(v=ws.10).aspx , chose the one you like to.
Step7:
Save all and Rebuild the setup project.
Job Done !
Now our setup is ready to install our windows application.
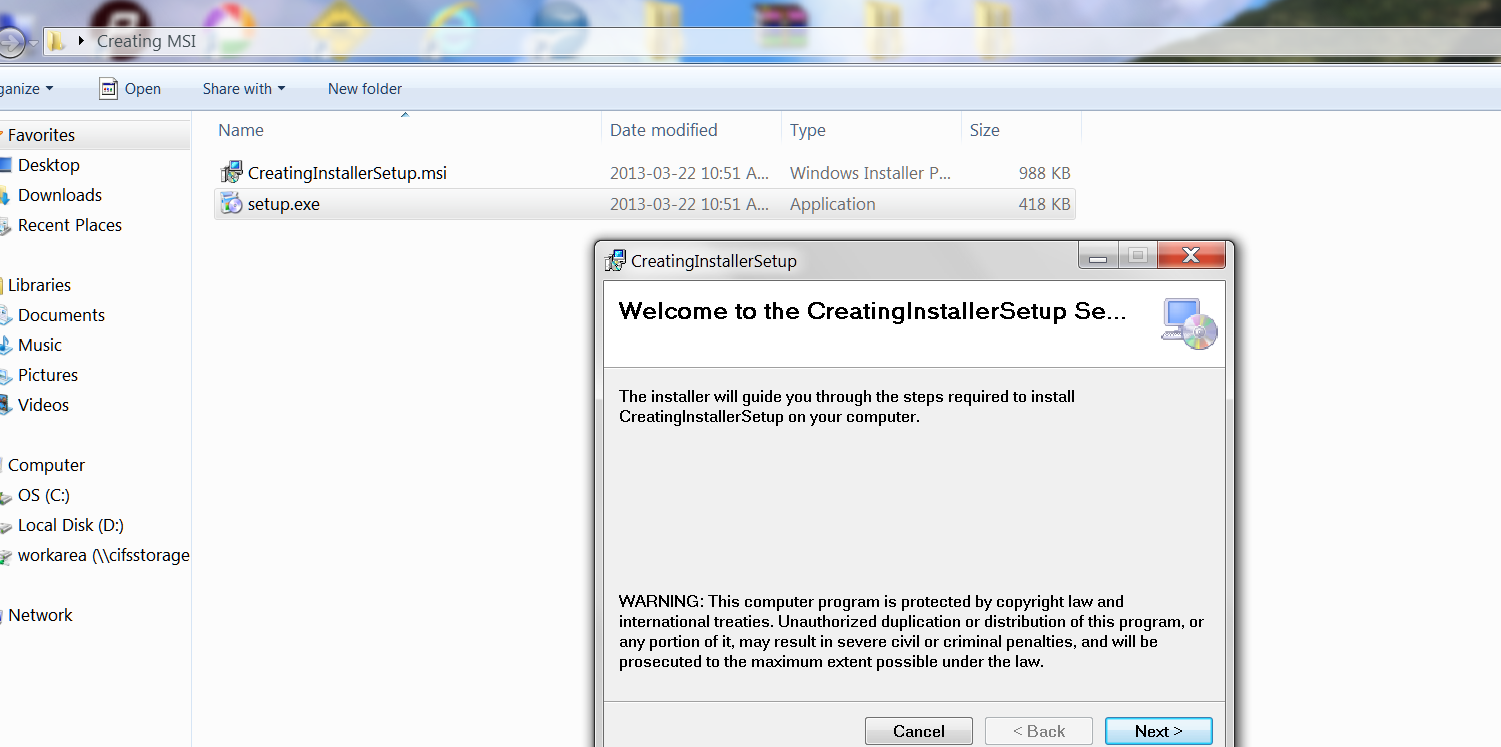
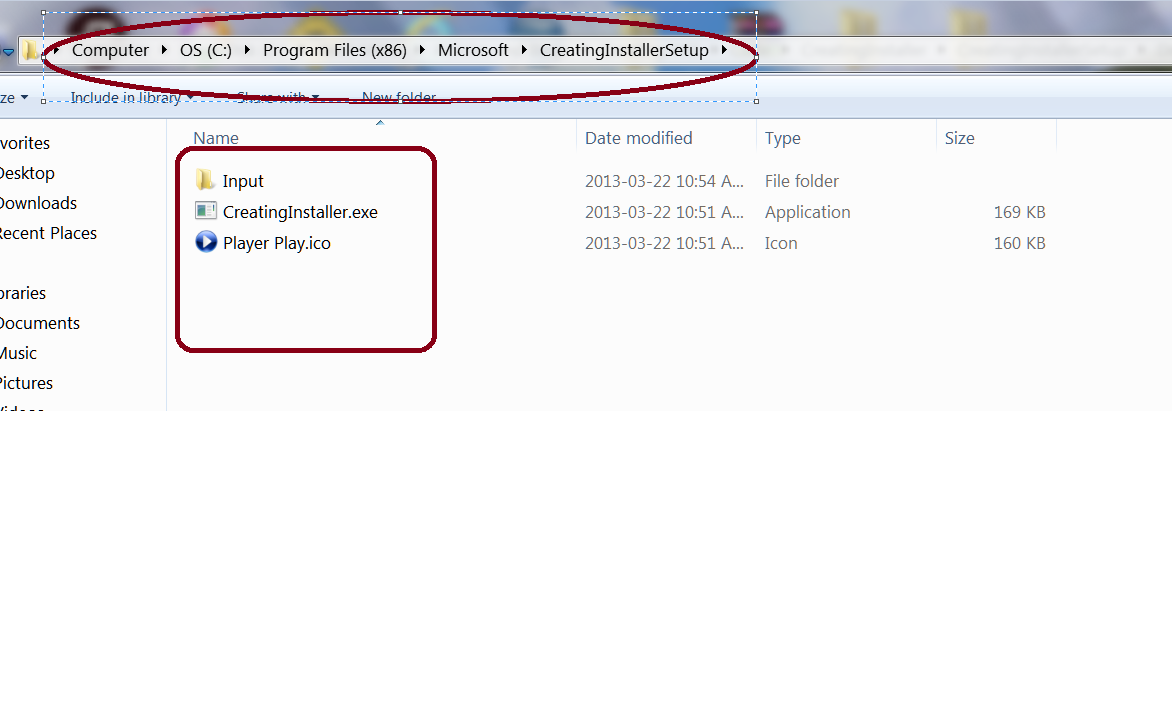
Just browse the debug folder location of Setup project, we find a msi and a setup.exe, one can run either of two to initiate setup.
When started we see a setup wizard, having screens which welcome’s user, which asks for location to install(already showing default location set.)
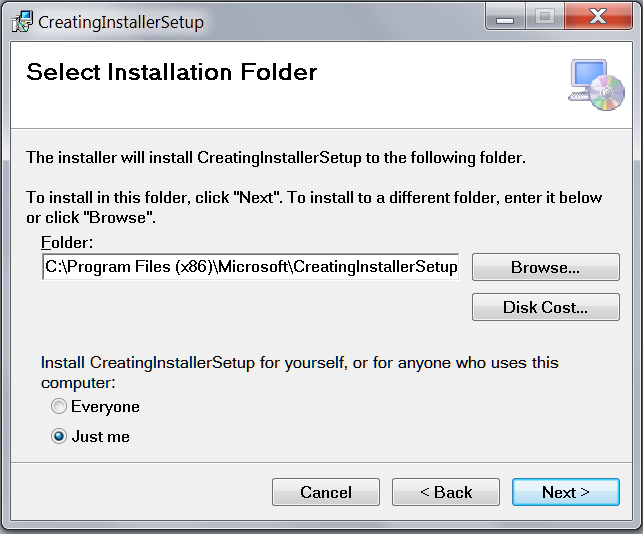
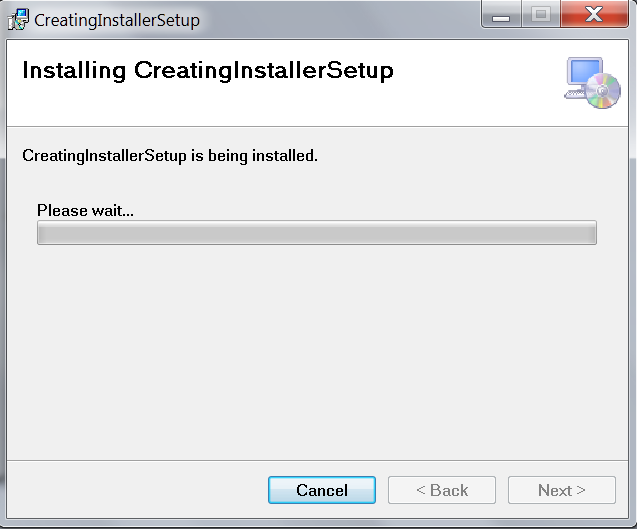
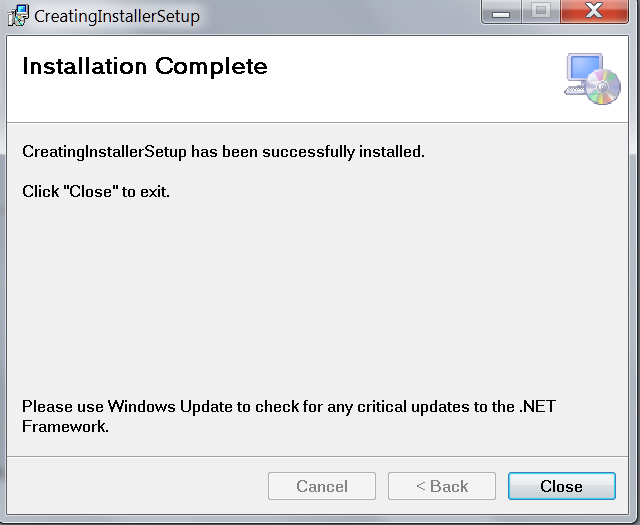
After completing the wizard,Click the close button.
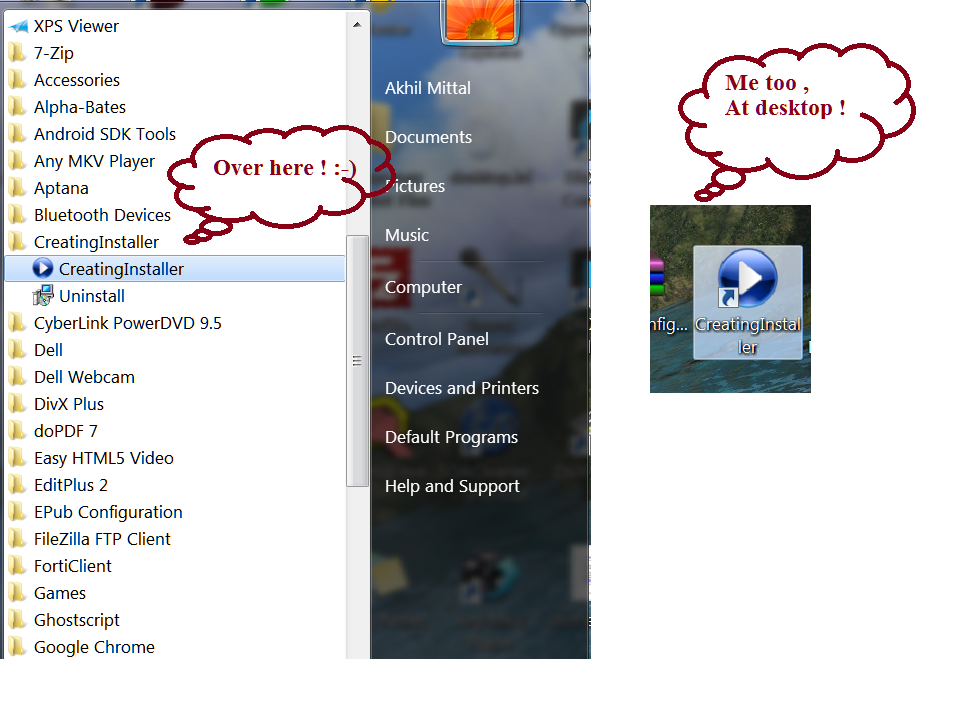
Now Job is done, we can see our shortcuts to the application created at desktop and User’s Program Menu like in below given figure.
Now if we navigate to out installation location we can also see the Input folder created and Sample.txt file resting inside it.
Run the application and see the output, works perfectly as was when executed from visual studio.
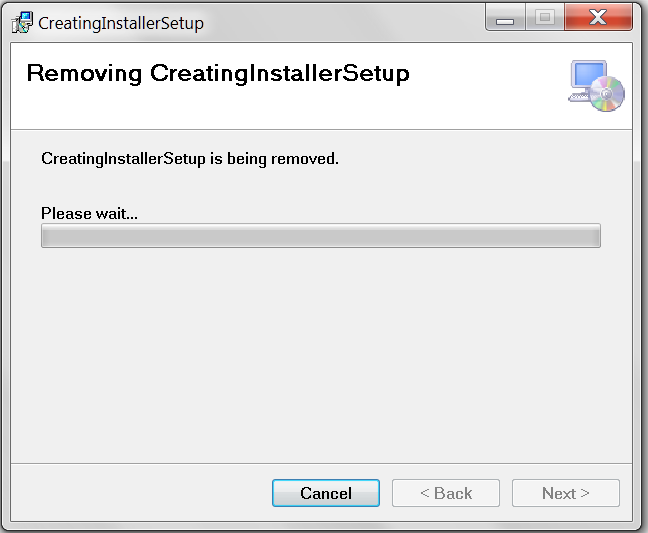
Click on uninstall to remove the application, the wizard launches as shown below,
Custom Actions
Just wanted to give a glimpse of Custom Actions we can define, while making setup.
Custom actions are the actions which contains customized functionality apart from default one at the time of installation and uninstallation. For e.g. My QC team reported a bug that when the run the application and in background uninstall the application, the application still keeps on running. As per them it should show a message or close while uninstallation. Hard to explain them the reason, I opted for implementing their desire in setup project.
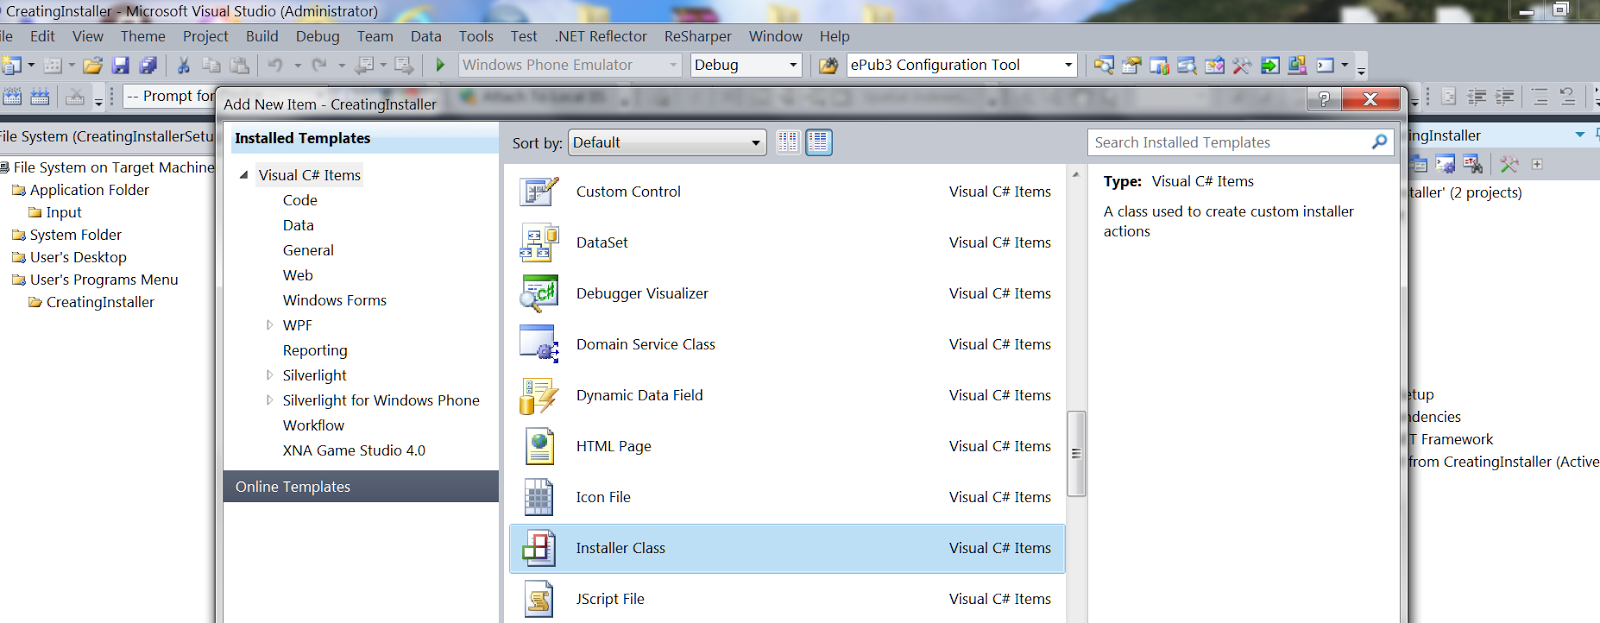
1.Just add an installer class to the windows application we created earlier. When we open the installer class we can see the events specified for each custom action i.e. for Installation, Uninstallation, Rollback,Commit.
My need was to write code for uninstallation, so I wrote few lines to fulfill the need,
The code contains the logic to find the running exe name at the time of uninstallation, if it matches my application exe name, just kill the process. Not going into more details to it.Just want to explain the use of custom actions.
using System;
using System.Collections;
using System.Collections.Generic;
using System.ComponentModel;
using System.Configuration.Install;
using System.Diagnostics;
using System.Linq;
namespace CreatingInstaller
{
[RunInstaller(true)]
public partial class Installer1 : System.Configuration.Install.Installer
{
public override void Install(IDictionarysavedState)
{
base.Install(savedState);
//Add custom code here
}
public override void Rollback(IDictionarysavedState)
{
base.Rollback(savedState);
//Add custom code here
}
public override void Commit(IDictionarysavedState)
{
base.Commit(savedState);
//Add custom code here
}
public override voidUninstall(IDictionary savedState)
{
Processapplication = null;
foreach(var process inProcess.GetProcesses())
{
if(!process.ProcessName.ToLower().Contains(“creatinginstaller”)) continue;
application = process;
break;
}
if(application != null && application.Responding)
{
application.Kill();
base.Uninstall(savedState);
}
}
}
}
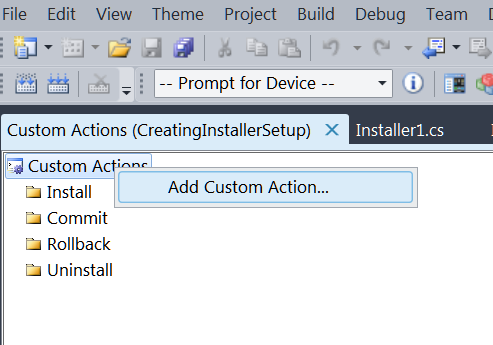
2. Click on Custom Actions Editor after selecting CreatingInstallerSetupproject.
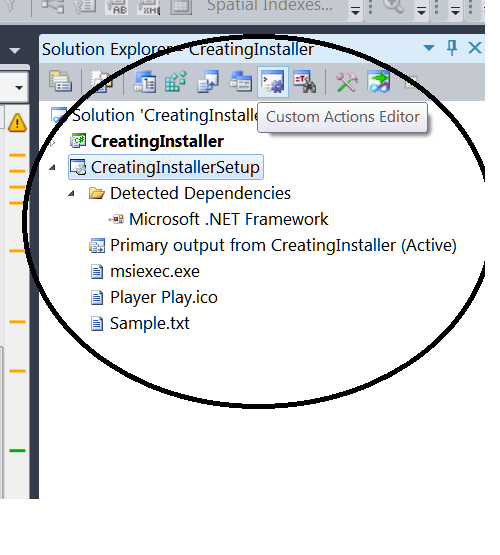
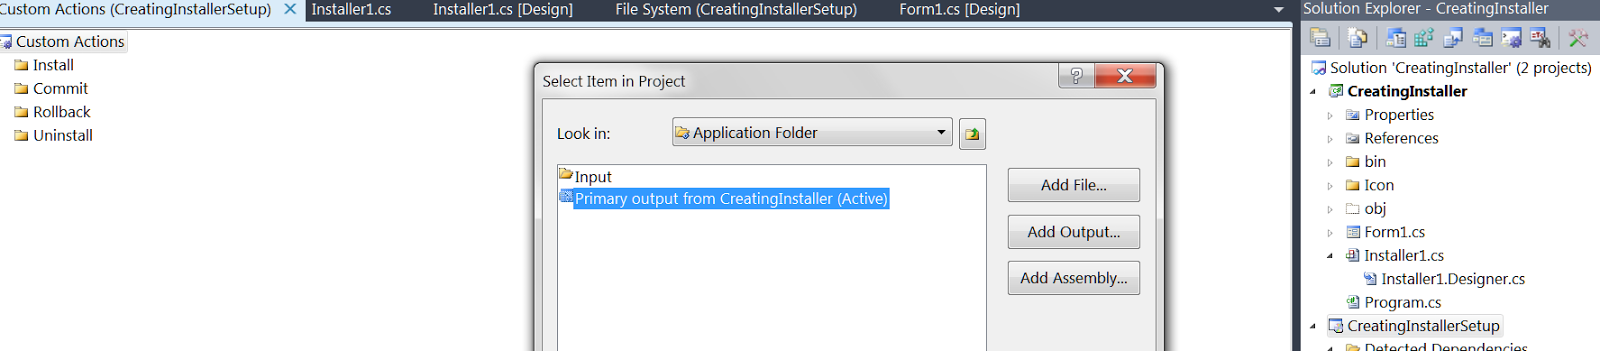
3. We see custom action editor pane on left window, right click it to add custom action and select primary output in Application Folder.
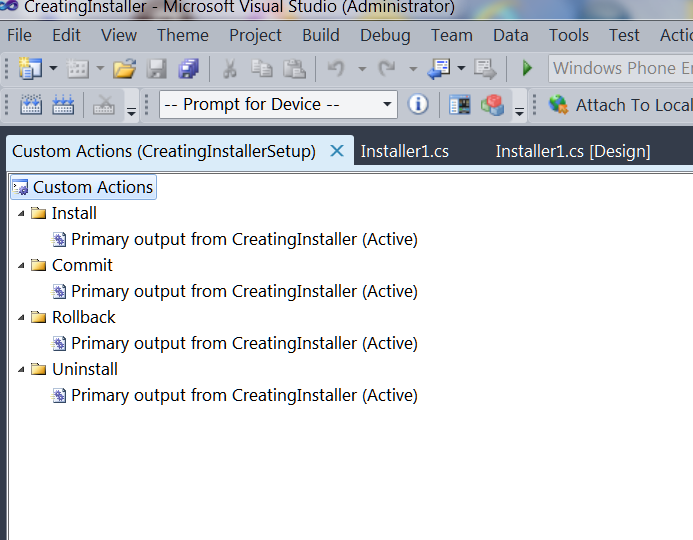
4. We see primary output added as custom actions now. Now at the time of uninstallation my custom action will be fired, and application will be closed while uninstalling it.
.Net Framework
What if installation machine do not have .net framework. We can specify our own package supplied with installation, so that our application do not depend on the .net framework of client machine, but points to the package we supplied to it to run.
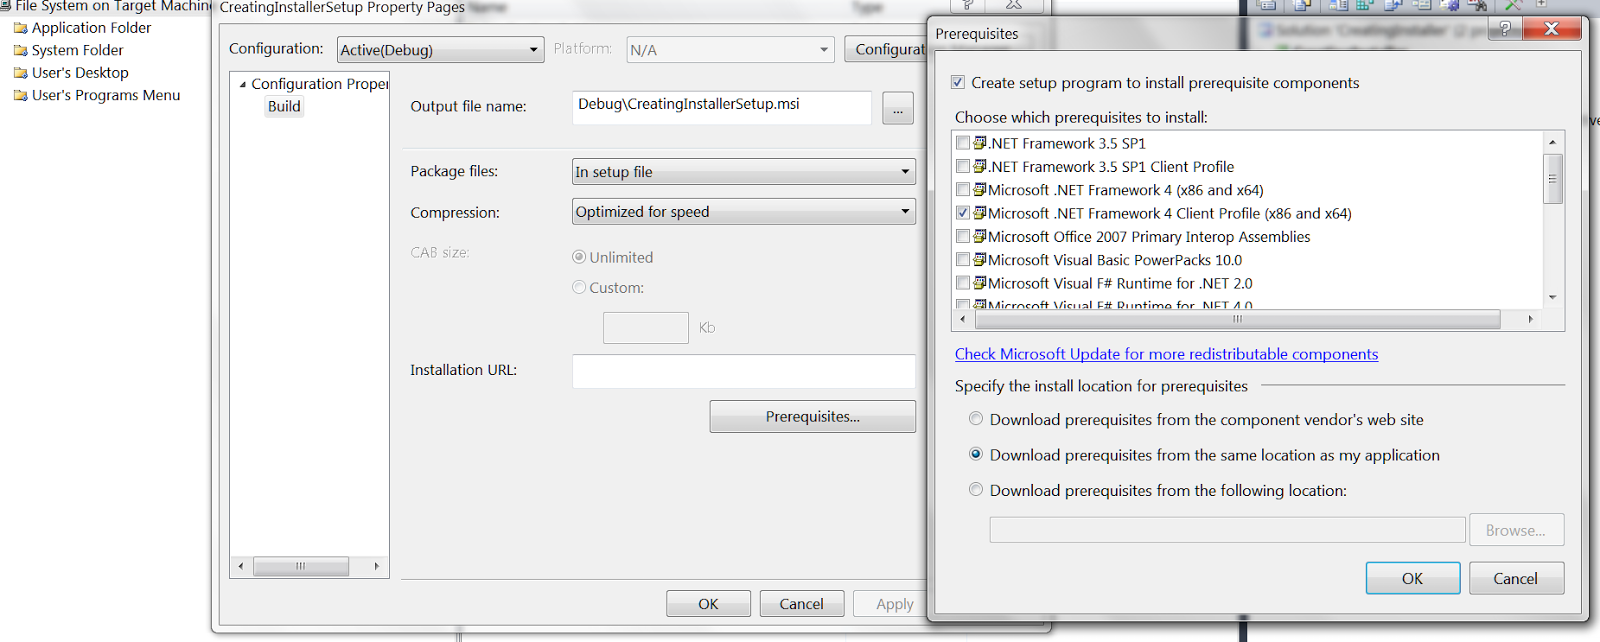
Right click on Setup project, to open properties window.
Here we can specify pre-requisites for the application to install. Just click on Prerequisites button and, in the opened prerequisites window, select checkbox for the .net framework application needs to follow, and select radio button at no. 2 i.e. Download prerequisites from the same location as my application. Press OK save the project and re-build it.
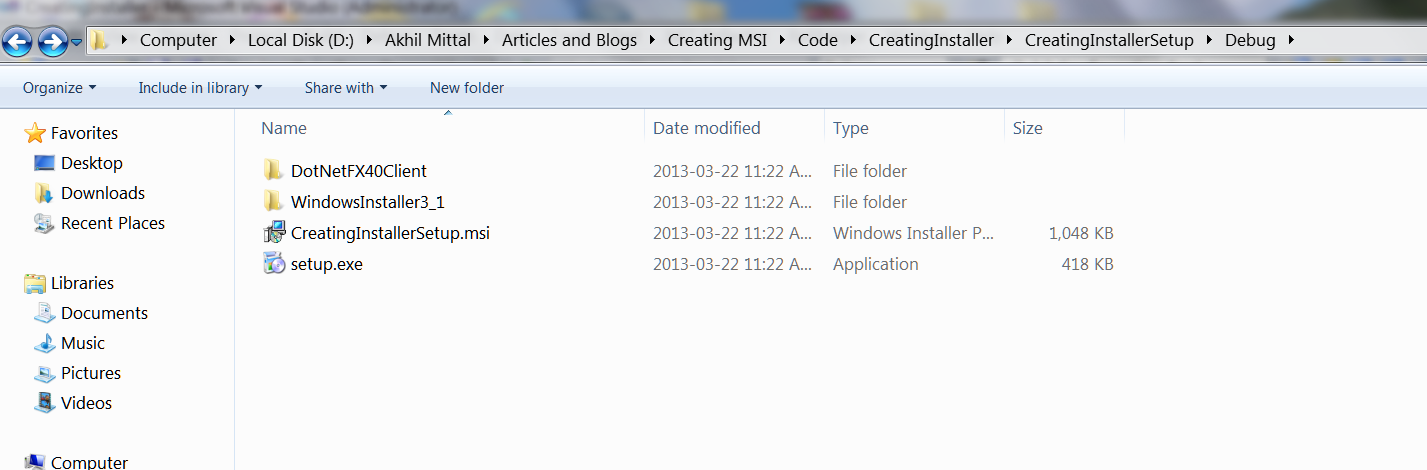
Now when we browse to Debug folder of Setup project we see two more folders as a result of actions we did just now.
Now this whole package has to be supplied to the client machine for installation of the application.
Now re-install the application from setup.exe, and launch it using shortcuts.
Conclusion
The tutorial covers the basic steps for creating the installation project. I did not go very deep explaining registry, license agreements though. There are many things to be explored yet to understand and master this topic. However, this article was just a start for a developer to play around with setup and deployments. Happy Coding J
