Download Source Code
Introduction :
In my previous article I discussed about developing a simple basic multilayered architecture for a .Net application.However there were few points that I skipped considering that the article was for beginners.When we talk about an application architecture there are certain points that need to be put into consideration before initiating,
-
Is the architecture loosely coupled?
-
Is it to be service based?
-
Where should the entities reside?
-
What should be Mode of Communication with the database?
-
Do it require design patterns? If yes,What patterns should be implemented?
-
Should it be based on Seperation of Concerns?
To answer these type of questions, .Net 4 has come up with a generic solution,making use of Entity Framework.
My effort in this article would be to put some light on building a generic multilayered architecture using Entity Framework 4.1 and MVC3 razor view engine.We’ll use inversion of control to resolve dependency of layers.The points to be covered in this article would be as follows,
-
Use of Seperation of Concerns,
-
Use of Code First approach,
-
POCO objects,
-
Repository Pattern,
-
Dependency Injection and Inversion of Control.
Architecture Overview:
I have created an architecture to explaing all the above mentioned points, and we’ll stick to this architecture till the end of article thus implementing practically our understanding.
I have created a very simple application to add student details in database, To edit it and to delete it,My first page shows list of all added student.
The arcitecture is service based, following are the components and pictorial representation (fig1) of it, we’ll discuss each component in detail,
-
CodeFirstData layer.
-
CodeFirstEntities layer.
-
CodeFirstServices layer.
-
MVC Portal layer.
 Architecture components:Let’s discuss each and every component of the defined architecture in detail,
-
CodeFirstData layer :
The data layer is the class library defining a layer which is responsible for interacting with database, contains context classes and a factory pattern implementation to interact with database.The layer contains the repository for each entity to map with database,thus making a complete ORM (Object Resource Model) solution.The class library references EntityFramework dll to implement the dbcontext classes.-
CodeFirstEntities layer:
Entity layer acts as a model to MVC application,and also responsible for creation of DataBase objects when the dbset is first executed.It contains Entity classes in POCO form, having relations and data annotations(Rules/Constraints to be put on Database table/columns).The properties of the class results in column name in database and name osf the class in Dtaabase table.Primary key is either defined by the property named Id or “Classname[Id]”,in our case “StudentId”,this is default protocol set by entityframework to keep in mind while creating entities.Since this application is codefirest,we need to create entities first.-
CodeFirstServices layer:
The layer contains services which uses repositories to fetch data from database. The interaction between Services and Repositories is kept loosely coupled thus implementing Inversion of Control using Dependency Injection.Its constructor based dependency injection and do not allow service to make direct instance of our repositories.Service layer acts as an interface between controllers and repositories,passes request of controller to repositories.-
MVCPortal layer:
MVCPortal layer is our UI layer, it contains Model/ViewModels,Views and Controllers.I am not going into details of MVC as its not our primary target,I assume that you already know how to create and run MVC application,Lets have a quick revision of MVC,-
Model / Viewmodel:
Model classea are responsible for holding up and manipulating data,we bind model/viewmodel classes to views to display model specific data.model classes are prepopulated by controllers to show data with the lehp of views.-
Views :
Views holds up our UI templates, We have controller methods defined for every view, which populates View Design with data, and requests particular type of view to be rendered at user’s end as per requirement.-
Controllers :
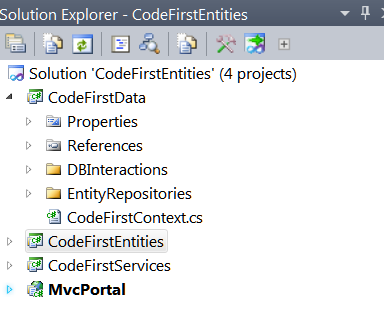
Web-based MVC frameworks map URLs to server code in a bit different fashion. Instead of mapping incoming URLs to html/aspx files, they instead map URLs to methods on classes. These classes are called “Controllers” and they are responsible for processing incoming HTTP requests, handling user input, retrieving and saving data, and determining the response to send back to the client (display HTML, download a file, redirect to a different URL, etc.).The layer makes use of Dependency injection to achieve Inversion of Control for services, thus not allowing controllers to directly acces services instances,The IOC is acheived using global.asax file using UnityFramework library of Microsoft.5. Dlls : I have created DLLs folder and given the output build path for every class library to that folder, for ease of access to Dll’s to add reference.Now each Dll will be created in the Dlls folder and we can access the desired Dll from the same folder. Also keep the EntityFramework,UnityConfiguration Dlls into it.IOC and DI :Dependency Injection is an important component in my application . All the services are required to be late bound with Model layer with Dependency Injection. In addition, the IoC container manages the lifetime of service objects. For example theContextobject. I set lifetime type asPerThreadLifetimeManagerin Unity configuration. This makes one and only one context object created in a single request and the different request has a differentcontextobject. Another thing I want to mention is ASP.NET MVC3 has its own way to provide Dependency Inject for controller via implementingDependencyResolverinterface. The IoC container I used in the demo is Unity.Container :The “Container” or “IOC Container” is the main object that is used to create objects and inject dependencies into them. Whenever you want an object to be open to IoC, you have to use the container to create the instance using container.Resolve() method instead of the “new” keyword.IService service = unityContainer.Resolve();I have added following references to acheive the same,Microsoft.Practices.UnityMicrosoft.Practices.Unity.ConfigurationThe code for IOC is implemented in global.asax file.Step by Step Process to create the Application using EntityFramework Architecture :Application Overview :We’ll try to develop a simple studentDetails application with the help of discusses architecture,The application’s main module will be to Create a new student, Edit existing student,Delete existing student, and to show list of all students.Looking into a wider/generic perspective, the application performs CRUD operations on database with the help of EF .Note that we’ll not create databse by our own,we just write classes and defing connection configuration of our database server in web.config file, and let EntityFramework do rest of the job of creating database, managing database and Mapping database with our entities.Step1. Creating a solution and blank projects/seperating them logically/physically as layers :Our first initiative is to prepare our initial level architecture there by creating solution and adding project files to it, We create a solution named CodeFirstEntities and add three class libraries to it thus defining our three layers which are Entity,Data and Service, the names of the class libraries which i chose are CodeFirstEntities,CodeFirstData and CodeFirstServices respectively.Now add an MVC3 application to the solution called MvcPortal, that will act as a UI layer for our application. Refer fig2 for implementing the first step. ( fig2 )Step 2. Creating Entities :Add Student.cs class to CodeFirstEntities project , this class will contain the student details specific properties that will take the shape of database table and columns . The class makes use of DataAnnotation dll to put data annotations (rules/constraints) over the properties that will be reflected in database table.The constraints like max length and required parameter are provided as attributes over the properties of the class as shown in fig3 and fig4,
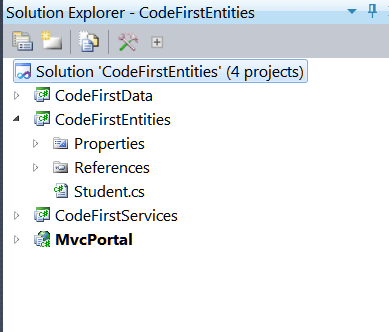
( fig3 )
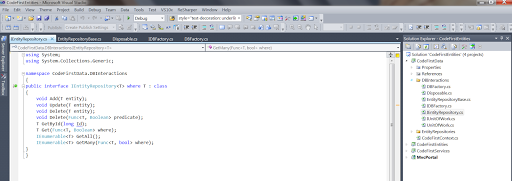
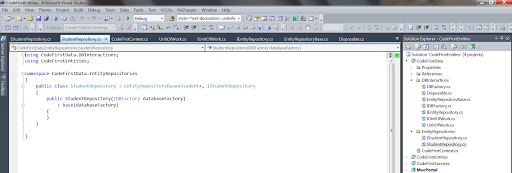
 ( fig4)The above entities is very simple POCO (Plain Old CLR Object) class and the entity Student is decorated with validation attributes in the System.ComponentModel.DataAnnotations namespace. Now we want to use these entities for defining model objects for the Entity Framework 4. Using the Code First approach of Entity Framework, we can first define the entities by simply writing POCO classes without any coupling with any API or database library. This approach lets you focus on domain model which will enable Domain-Driven Development for applications. EF code first support is currently enabled with a separate API that is runs on top of the Entity Framework 4.Step 3. Creating Repositories/Contexts :Our next step is to create the contexts/repositories for our application and classes that will interact with the database.A. Create Context Class for Entity Framework :We have already prepared our domain model now let’s create a class in order to working with Entity Framework Code First. I have added reference to EntitFramework.dll CTP 4.1 to this class library project. We create two folders DBInteractions and EntityRepositories to segregate our classes as in fig5, we’ll come to that later, first let me explain you the context class.
 (fig 5)
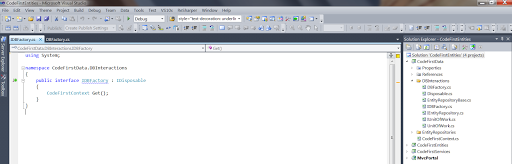
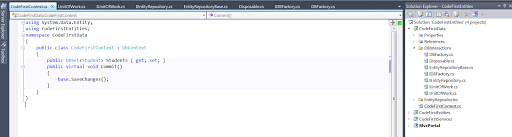 (fig 6)The above class CodeFirstContext in fig 6 is derived from DbContext that can connect your model classes to a database. The CodeFirstContext class is mapping our Student class todatabase tables Student use DbSet where TEntity is any POCO class. When we arerunning the application at first time, it will automatically create the database. EF code-first look for a connection string in web.config or app.config that has the same name as the dbcontext class. If it is not find any connection string with the convention, it will automatically create database in local SQL Express database by default and the name of the database will be same name as the dbcontext class. You can also define the name of database in constructor of the the dbcontext class. The model classes of Code First are working on the basis of conventions and we can also use a fluent API to refine our model. The convention for primary key is ‘Id’ or ‘Id’ as I discussed before. If primary key properties are detected with type ‘int’, ‘long’ or ‘short’, they will automatically registered as identity columns in the database by default. Primary key detection is not case sensitive. We can define our model classes with validation attributes in the System.ComponentModel.DataAnnotations namespace and it automatically enforces validation rules when a model object is updated or saved.I ) DBInteractions :B. Generic Repository for EntityFramework Code First:We have now created model class and dbcontext class. Now we create a generic repository pattern for data persistence with EF code first. Let’s create a generic repository to working with DbContext and DbSet as follows,The following classes will be added to DBInteractions folder for ease of understanding logic.
 (fig 7)
-
DataBase Factory:
We have our database factory class defined as follows, (fig 8)
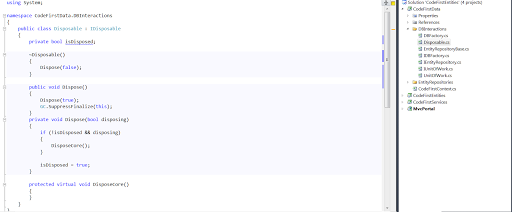
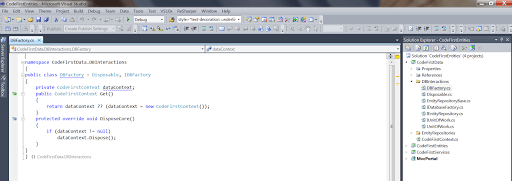 (fig 9)Where IDBFactory is the interface implemented by our factory class DBFactory.The factory class is inherited from Disposable class as shown below in fig 10,Responsible for releasing disposing database resources.
 (fig 10)
-
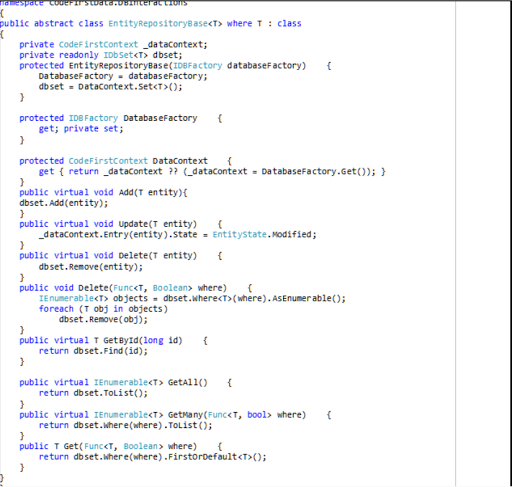
RepositoryBase – The Generic Entity Repository base class :
 Above is the repository base class that contains all the methods to be implemented for CRUD DB operations, we can define more of our generic methods here, for now considering our application, these are eough for proper understanding of the working.E. Unit of WorkThe Unit of Work pattern maintains a list of objects affected by a business transaction and coordinates the writing out of changes and the resolution of concurrency problems.We create a class for handling Unit of Work pattern,Interface :
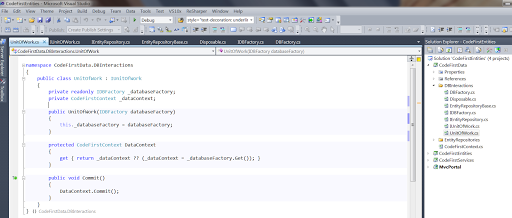
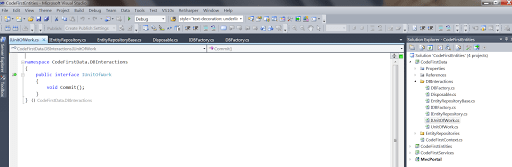 Class :
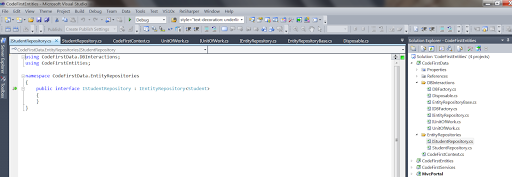
 The Commit method written in of the UnitOfWork will call the commit method of our Context class and it will execute the SaveChanges method of DbContext class.II ) Repository :In this article, we will be primarily focus on the persistence against Student entity . Let’s create a repository for handling CRUD operations for Studentusing derive from a generic Repository EntityRepositoryBase.Repository class for Student :Interface :
 Class :
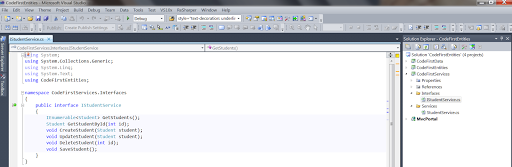
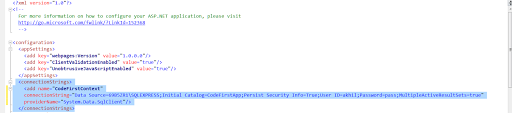
Step 4. Creating a Service layer :Service Layer defines an application’s scope and its available set of operations from the perspective of interfacing client layers. It encapsulates the application’s business logic,controlling transactions and coordinating responses in the implementation of its operations. Controller classes should be made light and do not put much of business logic onto it. We can usethe service layer as the business logic layer and can encapsulate the rules of the application.We define interfaces and corresponding student service for our application business logic,Since we are targetting CRUD operations, so the methods are quite simple in implementation,Interface : As we can see in abve interface the methods are to Get Student Details,List,Update and Delete Student.Class :usingSystem.Collections.Generic;usingCodeFirstData.DBInteractions;usingCodeFirstData.EntityRepositories;usingCodeFirstEntities;usingCodeFirstServices.Interfaces;namespaceCodeFirstServices.Services{publicclassStudentService: IStudentService{privatereadonlyIStudentRepository_studentRepository;privatereadonlyIUnitOfWork_unitOfWork;publicStudentService(IStudentRepositorystudentRepository, IUnitOfWorkunitOfWork){this._studentRepository = studentRepository;this._unitOfWork = unitOfWork;}#regionIStudentService MemberspublicIEnumerable<Student> GetStudents(){varstudents = _studentRepository.GetAll();returnstudents;}publicStudentGetStudentById(intid){varstudent = _studentRepository.GetById(id);returnstudent;}publicvoidCreateStudent(Studentstudent){_studentRepository.Add(student);_unitOfWork.Commit();}publicvoidDeleteStudent(intid){varstudent = _studentRepository.GetById(id);_studentRepository.Delete(student);_unitOfWork.Commit();}publicvoidUpdateStudent(Studentstudent){_studentRepository.Update(student);_unitOfWork.Commit();}publicvoidSaveStudent(){_unitOfWork.Commit();}#endregion}}Class uses refernces of Repositories and Entities, and Dependency of Repositories is resolved in Constructor of the service itself.Step 5. The MVC Portal :Before we start MVC portal,Lets clear our logic for IOC and DI.I have already discussed IOC in the article.For resolving Dependency we create certain classes as discussed below, to get independent service request,We also create a custom lifetime manager for Unity to store container in the current HttpContext.publicclassHttpContextLifetimeManager : LifetimeManager, IDisposable{publicoverrideobjectGetValue(){varassemblyQualifiedName = typeof(T).AssemblyQualifiedName;if(assemblyQualifiedName != null)returnHttpContext.Current.Items[assemblyQualifiedName];returnnull;}publicoverridevoidRemoveValue(){varassemblyQualifiedName = typeof(T).AssemblyQualifiedName;if(assemblyQualifiedName != null)HttpContext.Current.Items.Remove(assemblyQualifiedName);}publicoverridevoidSetValue(objectnewValue){varassemblyQualifiedName = typeof(T).AssemblyQualifiedName;if(assemblyQualifiedName != null)HttpContext.Current.Items[assemblyQualifiedName] = newValue;}publicvoidDispose(){RemoveValue();}}}We create a dependency resolver for resolving service dependency as follows,ASP.NET MVC 3 has introduced a new interface IControllerActivator which lets you activate controllers with custom behavior and can be use it for dependency injection purpose.TheIControllerActivator interface is discoverable using the dependency resolver. Let’s create a custom controller activator class by deriving from IControllerActivator intrefaceusingSystem;usingSystem.Web.Mvc;namespaceCodeFirstPortal.IoC{publicclassCustomControllerActivator: IControllerActivator{IControllerIControllerActivator.Create(System.Web.Routing.RequestContextrequestContext,TypecontrollerType){returnDependencyResolver.Current.GetService(controllerType) asIController;}}}We also create a UnityController Factory and Configure contract and concrete types of unity in global.asax file.ASP.NET MVC 3 has also introduced a new interface IDependencyResolver which exposes two methods – GetService and GetServices.The GetService method resolves singly registered servicesthat support arbitrary object creation and the GetServices resolves multiply registered services. Implementations of the IDependencyResolver interface should delegate to the underlyingdependency injection container to provide the registered service for the requested type. When there are no registered services of the requested type, the ASP.NET MVC framework expectsimplementations of this interface to return null from GetService and to return an empty collection from GetServices. Let’s create a custom dependency resolver class by deriving fromIDependencyResolver intreface in order to working with Unity to providing dependency injection.usingSystem;usingSystem.Web;usingSystem.Web.Mvc;usingSystem.Web.Routing;usingMicrosoft.Practices.Unity;namespaceCodeFirstPortal.IoC{publicclassUnityControllerFactory: DefaultControllerFactory{IUnityContainercontainer;publicUnityControllerFactory(IUnityContainercontainer){this.container = container;}protectedoverrideIControllerGetControllerInstance(RequestContextreqContext, TypecontrollerType){IControllercontroller;if(controllerType == null)thrownewHttpException(404, String.Format(“The controller for ‘{0}‘ could not be found”+ “or it does not implement IController.”,reqContext.HttpContext.Request.Path));if(!typeof(IController).IsAssignableFrom(controllerType))thrownewArgumentException(string.Format(“Requested type is not a controller: {0}“,controllerType.Name),“controllerType”);try{controller= container.Resolve(controllerType) asIController;}catch(Exceptionex){thrownewInvalidOperationException(String.Format(“Error resolving the controller {0}“,controllerType.Name), ex);}returncontroller;}}Resolving Service Dependency :usingSystem;usingSystem.Collections.Generic;usingSystem.Web.Mvc;usingMicrosoft.Practices.Unity;namespaceCodeFirstPortal.IoC{publicclassUnityDependencyResolver: IDependencyResolver{IUnityContainercontainer;publicUnityDependencyResolver(IUnityContainercontainer){this.container = container;}publicobjectGetService(TypeserviceType){try{returncontainer.Resolve(serviceType);}catch{returnnull;}}publicIEnumerable<object> GetServices(TypeserviceType){try{returncontainer.ResolveAll(serviceType);}catch{returnnewList<object>();}}}}global.asax :Add service project reference , entity project reference and data project reference to the portal.The SetResolver method of DependencyResolver class provides a registration point for dependency injection containers. In this method, we configure the UnityDependencyResolver class forproviding dependency injection with Unity 2.0. The SetResolver method will be working with any dependency injection container.If you want to use StructureMap as the dependency injectioncontainer, you can create a dependency resolver class in order to working with StructureMap by deriving IDependencyResolver intreface and later you can configure this class with SetResolvermethod. The ASP.NET MVC 3 is providing a good support for working with dependency injection containers.usingSystem.Web.Mvc;usingSystem.Web.Routing;usingCodeFirstData.DBInteractions;usingCodeFirstData.EntityRepositories;usingCodeFirstPortal.IoC;usingCodeFirstServices.Interfaces;usingCodeFirstServices.Services;usingMicrosoft.Practices.Unity;namespaceMvcPortal{publicclassMvcApplication: System.Web.HttpApplication{publicstaticvoidRegisterGlobalFilters(GlobalFilterCollectionfilters){filters.Add(newHandleErrorAttribute());}publicstaticvoidRegisterRoutes(RouteCollectionroutes){routes.IgnoreRoute(“{resource}.axd/{*pathInfo}”);routes.MapRoute(“Default”, // Route name“{controller}/{action}/{id}”, // URL with parametersnew{ controller = “Home”, action = “Index”, id = UrlParameter.Optional } // Parameter defaults);}protectedvoidApplication_Start(){AreaRegistration.RegisterAllAreas();RegisterGlobalFilters(GlobalFilters.Filters);RegisterRoutes(RouteTable.Routes);IUnityContainercontainer = GetUnityContainer();DependencyResolver.SetResolver(newUnityDependencyResolver(container));}privateIUnityContainerGetUnityContainer(){//Create UnityContainerIUnityContainercontainer = newUnityContainer().RegisterType<IDBFactory, DBFactory>(newHttpContextLifetimeManager<IDBFactory>()).RegisterType<IUnitOfWork, UnitOfWork>(newHttpContextLifetimeManager<IUnitOfWork>()).RegisterType<IStudentService, StudentService>(newHttpContextLifetimeManager<IStudentService>()).RegisterType<IStudentRepository, StudentRepository>(newHttpContextLifetimeManager<IStudentRepository>());returncontainer;}}}To Start with MVC our first step is to define our connection string as follows in the web.config file.
 Steps to Create Controllers and Views :
-
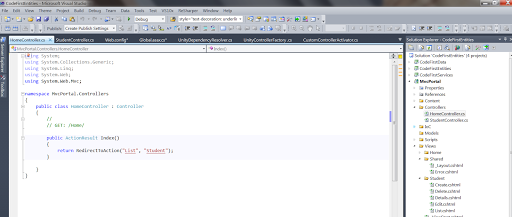
We start with home Controller, as it is the default controller set in global.asax to be called first.
-
We create Student Controller, We define actions in the controller for each operation we want to perform as follows,
When the Index action of the controller is called we redirect it to our Student Controller,which straight away returns view to show listy of students if exist,since its first time we are creating the controller,it shows an empty list, the controller method of Student fetches student list from database , but first it creates the database, thus acheiving our objective.usingSystem;usingSystem.Linq;usingSystem.Web.Mvc;usingCodeFirstEntities;usingCodeFirstServices.Interfaces;namespaceCodeFirstPortal.Controllers{publicclassStudentController: Controller{privatereadonlyIStudentService_studentService;publicStudentController(IStudentServicestudentService){this._studentService = studentService;}[HttpGet]publicActionResultDetails(int? id){varstudentDetails = _studentService.GetStudentById((int) id);if(studentDetails == null) thrownewArgumentNullException(“Not Found”);returnView(studentDetails);}[HttpGet]publicActionResultDelete(int? id){varstudentDetails = _studentService.GetStudentById((int) id);if(studentDetails == null) thrownewArgumentNullException(“Not Found”);returnView(studentDetails);}[HttpPost]publicActionResultDelete(Studentstudent){_studentService.DeleteStudent(student.StudentId);returnRedirectToAction(“List”, “Student”);}[HttpGet]publicActionResultEdit(int? id){varstudentDetails = _studentService.GetStudentById((int) id);if(studentDetails == null) thrownewArgumentNullException(“Not Found”);returnView(studentDetails);}[HttpPost]publicActionResultEdit(Studentstudent){_studentService.UpdateStudent(student);returnRedirectToAction(“List”, “Student”);}[HttpGet]publicActionResultCreate(){returnView();}[HttpPost]publicActionResultCreate(Studentstudent){varstudentModel = newStudent(){Address = student.Address,Country = student.Country,Name = student.Name,Age = student.Age,Email = student.Email};_studentService.CreateStudent(studentModel);returnRedirectToAction(“List”, “Student”);}[HttpGet]publicActionResultList(){varstudents = _studentService.GetStudents();if(students.Any()){returnView(“List”, students);}returnView(“List”);}}}There are get and corresponding Posts for each method responsible for Data Updations. The Constructor of the controller initializes the Service,we can see it do not create direct instance.-
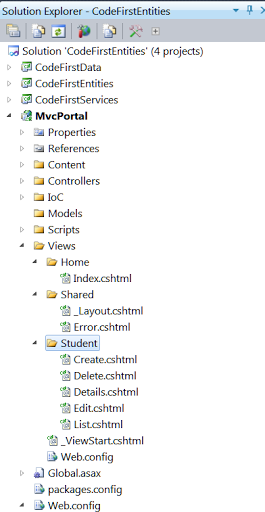
We Create Views for every Action,Its easy if we right click the controller action and create view,It automatically create a view with a Default folder named in the name of Constructor,So we can create all the views for our operations, and our solution looks like,
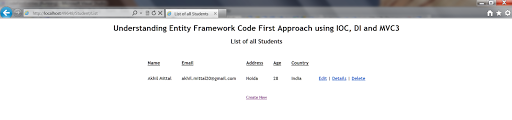
 4. Now we are ready with our application to be executed,keep your fingers crossed and see the magic, I have used _layout as master page to give some meaningful look and feel to my application,U can customize the same.When u run the application by pressing F5, We get redirected to the Index view of Student Controller,which shows list of students,since we are running it first time,we dont have existing list, and our application shows,
-
No wonder , just have a look at your DataBase, My case I am using Sql Server 2008,
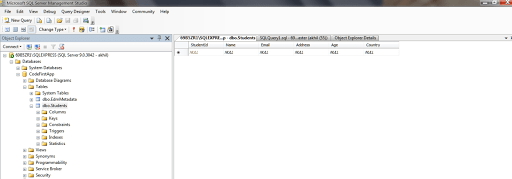 I got a Database created automativcally with the name CodeFirstApp having Student Table, Now you can cross verify the table with your entity,its the same.So we have hit the target and our database is successfully created.
-
Further Operations :
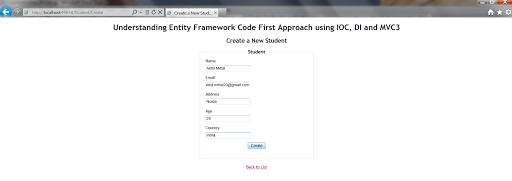
You can now test the application and perform further CRUD operations in the application and see the DataBase getting updated.e.g. Create Student, after Submit by pressing Create, we get,
 therefore one student created.We can edit the same student by pressing edit link , we get the view,
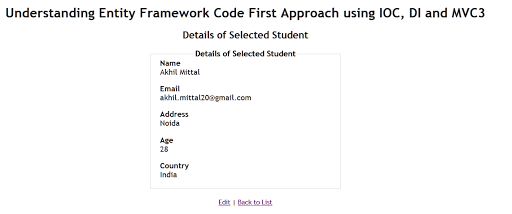
 Likewise we can see the details of already created student,
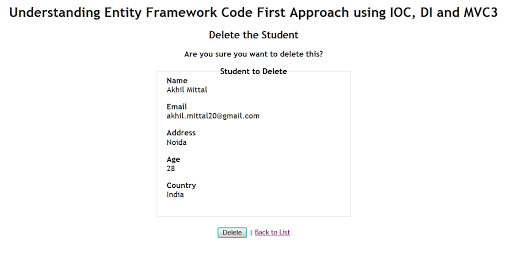
 and delete the student will redirect to ,
 I had created 3 students in the same manner, You can create more and play with the application.
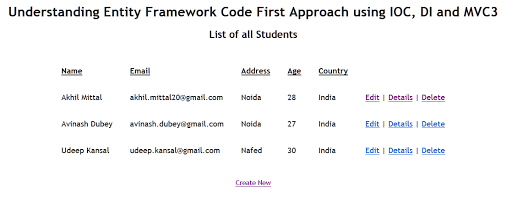 Risk Factor : There is also a Risk Factor in implementing EntityFramework, If we do any change in the entity, like deleting,changing property,The context will drop and recreate the database, which may clearly lead to loss of your existing data.To avoid this critical situation, we code some more, we call SetInitializer method of DataBase class and set it to null in our dataBase Factory Class.usingSystem.Data.Entity;namespaceCodeFirstData.DBInteractions{publicclassDBFactory: Disposable, IDBFactory{publicDBFactory(){Database.SetInitializer<CodeFirstContext>(null);}privateCodeFirstContextdataContext;publicCodeFirstContextGet(){returndataContext ?? (dataContext = newCodeFirstContext());}protectedoverridevoidDisposeCore(){if(dataContext != null)dataContext.Dispose();}}}Database class is from namespace System.Data.Entity, whcih provides such feature.Conclusion :In this article we discussed about creating an application using EntityFramework 4.1 Code First Approach, We used Inversion of control and Dependency Injection to Resolve Dependency between layers.We used MVC 3 razor view engine as our UI and integrated the layers to acheive our objective.The application was a description of simple CRUD operations on Database.We learned how to use Repository Pattern,Unit of Work pattern and Unity Framework.You can download the codebase and further enhance/extend it according to your need.Happy Coding.Learn Complete MVC Step by Step:
- Part1: Introduction to MVC architecture and Separation of Concerns.
- Part 2: Creating MVC Application from scratch and connecting it with database using LINQ to SQL.
- Part 3: Connecting the MVC Application with the help of EntityFramework DB-First approach.
- Part 4: Connecting the MVC Application with the help of EntityFramework Code-First approach.
- Part 5: Implementing Repository Pattern in MVC Application with EntityFramework.
- Part 6: Implementing a Generic Repository Pattern and Unit Of Work pattern in MVC Application with EntityFramework.
Articles : http://www.codeproject.com/script/Articles/BlogFeedList.aspx?amid=7869570
-
-
-